Configure EAP-TLS Authentication for Cloud Networks
Network infrastructure is becoming increasingly complex, especially with employees logging in remotely using their personal devices like cell phones or other BYOD. This makes it a complex system that on-prem servers can no longer manage.
There is also the additional challenge of identifying a user or device with absolute certainty in a password-based environment. Passwords do not provide a good identity context, as they can be stolen or shared. Issues such as a locked account for using the wrong password can increase the burden on IT teams.
Azure AD, by Microsoft, helps organizations move to the cloud. But it uses an LDAP server that relies on PEAP-MSCHAPv2 and, therefore, does not solve the challenges of password-based authentication.
Certificate-based authentication method EAP-TLS can help improve the security of your cloud network by helping you create an environment for identity context-based authentication.
In this article, we will explain how we can configure EAP-TLS authentication for cloud networks. First, we’ll take a look at what EAP-TLS is and how it compares to other authentication methods.
What Is EAP-TLS?
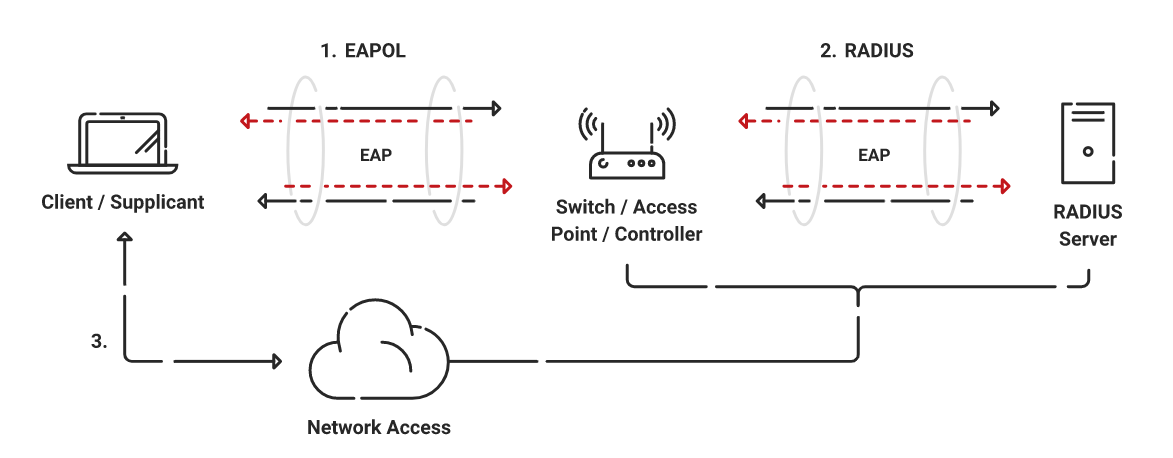
Extensible Authentication Protocol-Transport Layer Security (EAP-TLS) is an authentication protocol that allows the use of X.509 digital certificates for authentication. It uses Public Key Infrastructure (PKI) to enroll and manage certificates and is considered the gold standard of authentication.
Its use across the board as an authentication method for an enterprise network, however, is less popular. EAP-TLS as an authentication protocol was developed long ago when there was no onboarding solution available that could automate the certificate management process. The challenge of setting up the PKI causes most organizations to shy away from using this protocol.
SecureW2 has developed the industry’s best cloud PKI and Cloud RADIUS with EAP-TLS that integrate with Azure AD seamlessly to provide excellent certificate-based authentication for Wi-Fi. Read our customer success stories to find out more about how we helped organizations to move their networks to the cloud and go passwordless.
The User Experience With EAP-TLS
EAP-TLS with a RADIUS server, used in an enterprise network, improves network security and performance and, overall, provides a better user experience for unmanaged and managed devices.
EAP-TLS Eliminates Password-Related Disconnects
Certificates eliminate all issues related to password management that create a terrible user experience in a credential-based environment. When a certificate is created for a user or a device, the certificate templates will be recorded with certain information unique to the user or the device. This information, which provides a better identity context, is used to verify the identity at the time of authentication, thus eliminating the need for submitting credentials.
EAP-TLS Is More Secure
EAP-TLS authentication, when deployed with a RADIUS server, makes your network more secure. It mitigates the risks of over-the-air threats such as Man-in-the-Middle (MITM) attacks since there is no data to intercept.
Certificate-based authentication does not require transferring of passwords over the air. Authentication is complete with a successful private-public key handshake and an authentication server like RADIUS verifying the certificate is valid.
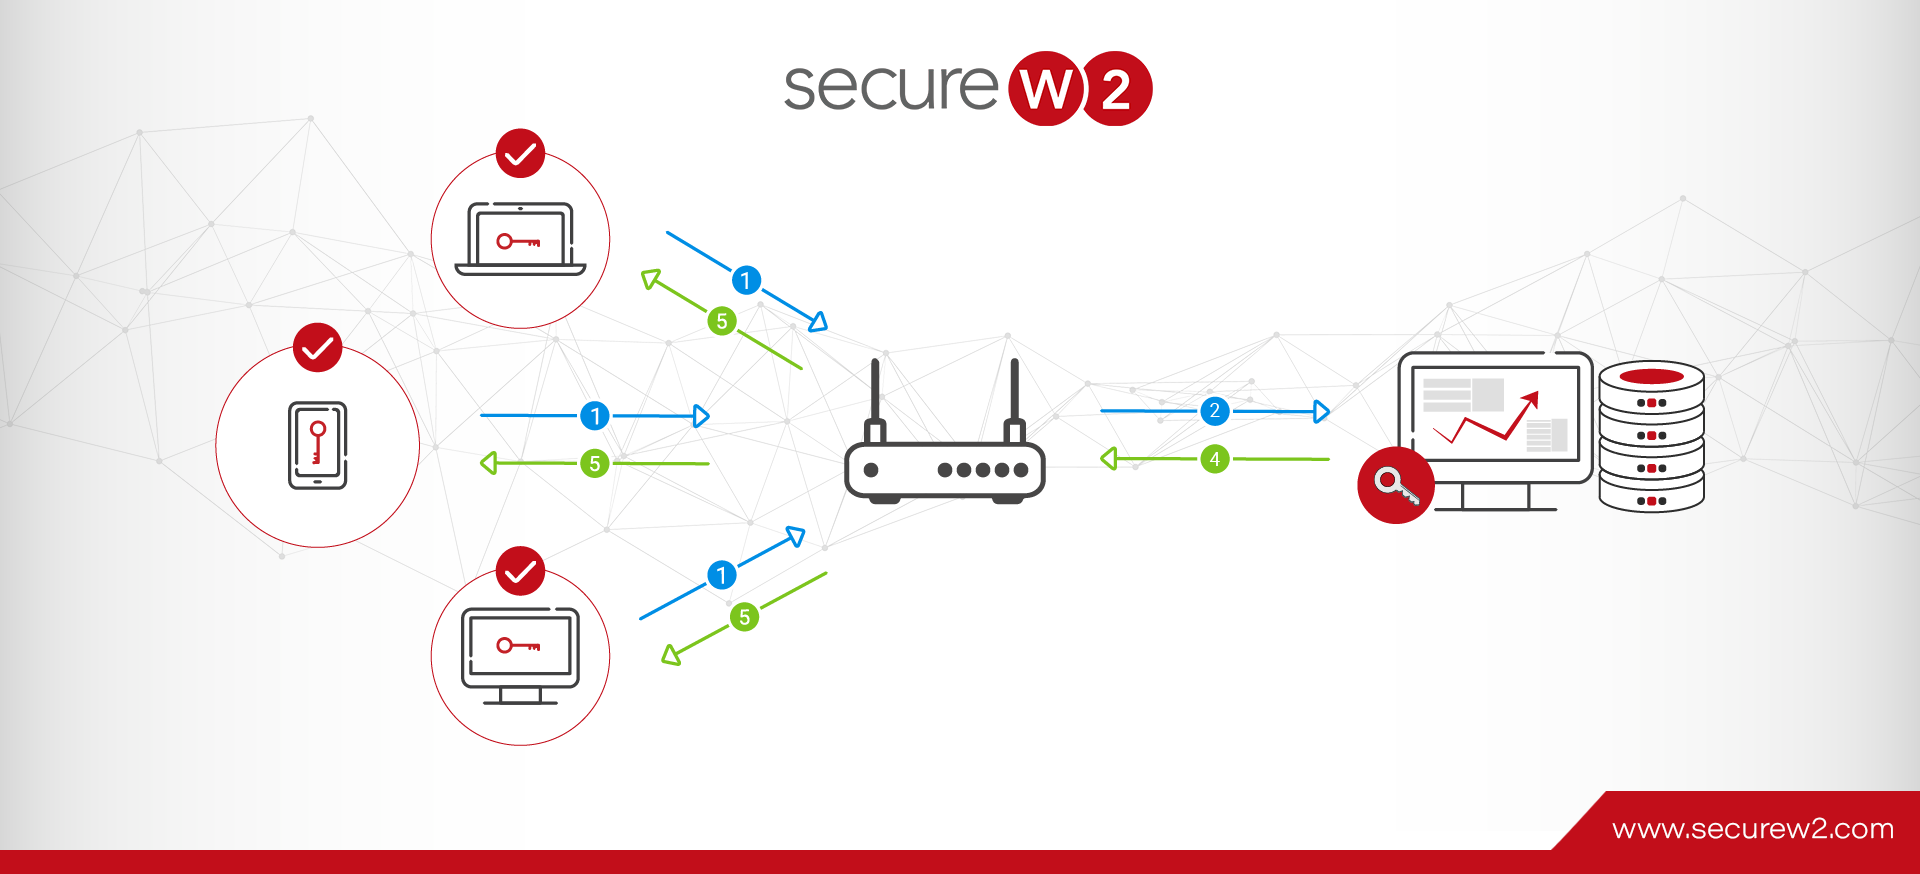
Authentication With EAP-TLS and RADIUS Is Faster
EAP-TLS has fewer steps than other credential-based authentication protocols, making it more efficient. Cloud RADIUS, which is designed for EAP-TLS, does real-time look-up with IDPs at the time of authentication, and it does so very quickly by integrating natively with all major IDPs.
EAP-TLS vs. Other WPA2 & WPA3-Enterprise Authentication Protocols
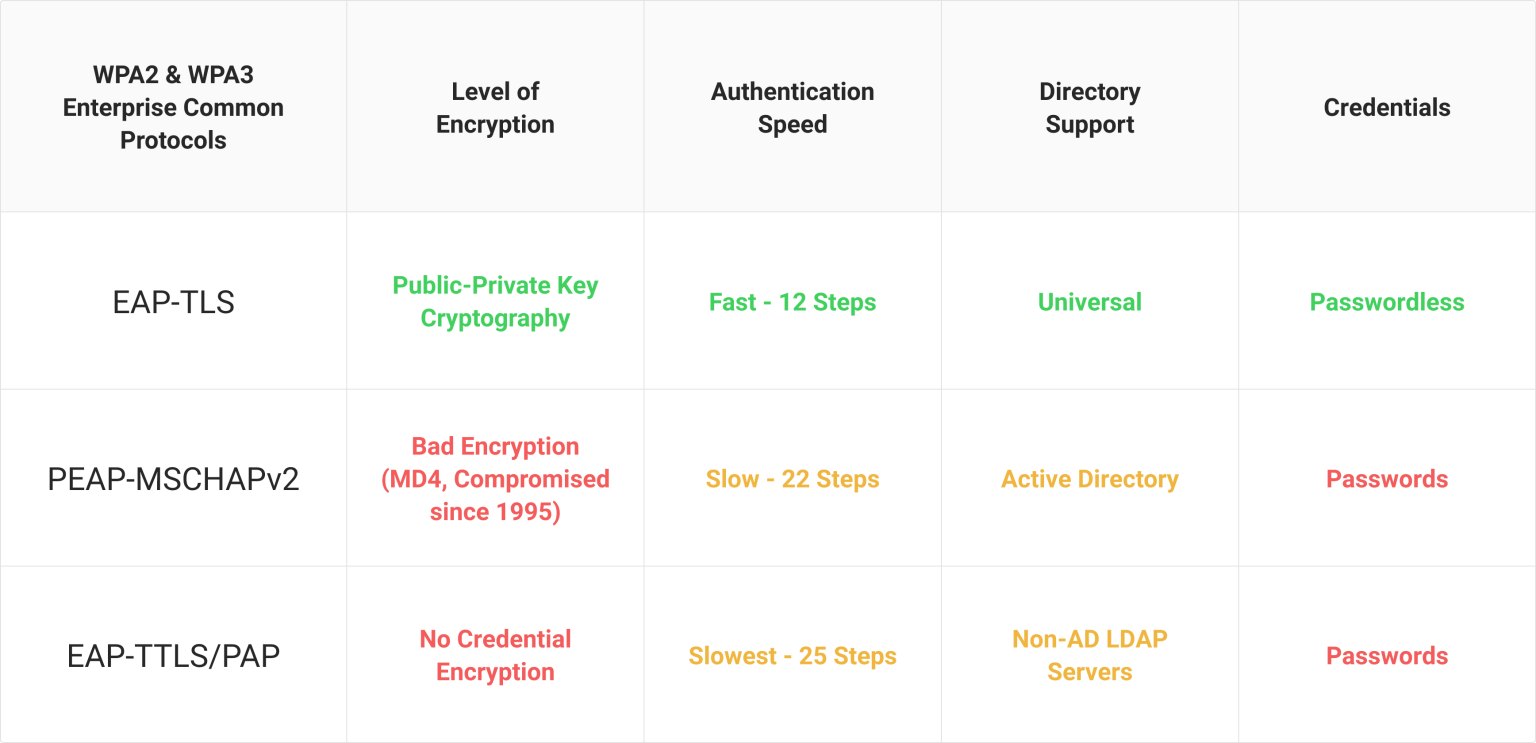
EAP-TLS is considered the most secure of the three authentication protocols because of certificates. X.509 certificates cannot be stolen because of the public and private key combinations that are almost impossible to crack. Also, with certificate authentication, there is no need for human input, thus reducing the risks due to human error.
In a work environment with multiple locations for login, identity context-based authentication is considered the most effective. That’s because it helps implement a zero-trust network that demands always verifying the client, not just at the time of authentication but continuously monitoring user behavior to detect any suspicious activity.
A certificate-based EAP-TLS protocol creates the foundation for a network security infrastructure that can dynamically monitor user behavior and, with the help of machine learning, identify and stop any behavior that is not on par with the usual user activity.
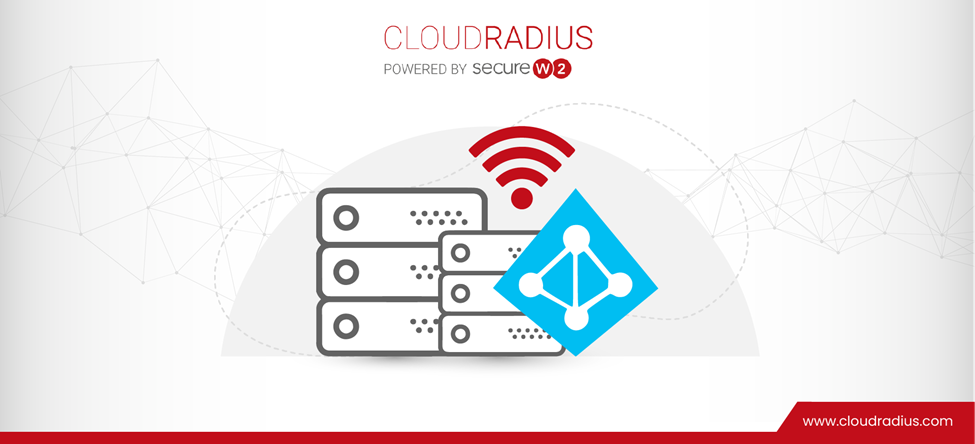
Native Integration With Azure AD for Deploying Enterprise Networks
With SecureW2’s onboarding solutions, configuring a certificate is completely automated, making it a great user experience. We can help you configure EAP-TLS authentication by easily integrating your existing infrastructure with our turnkey solutions.
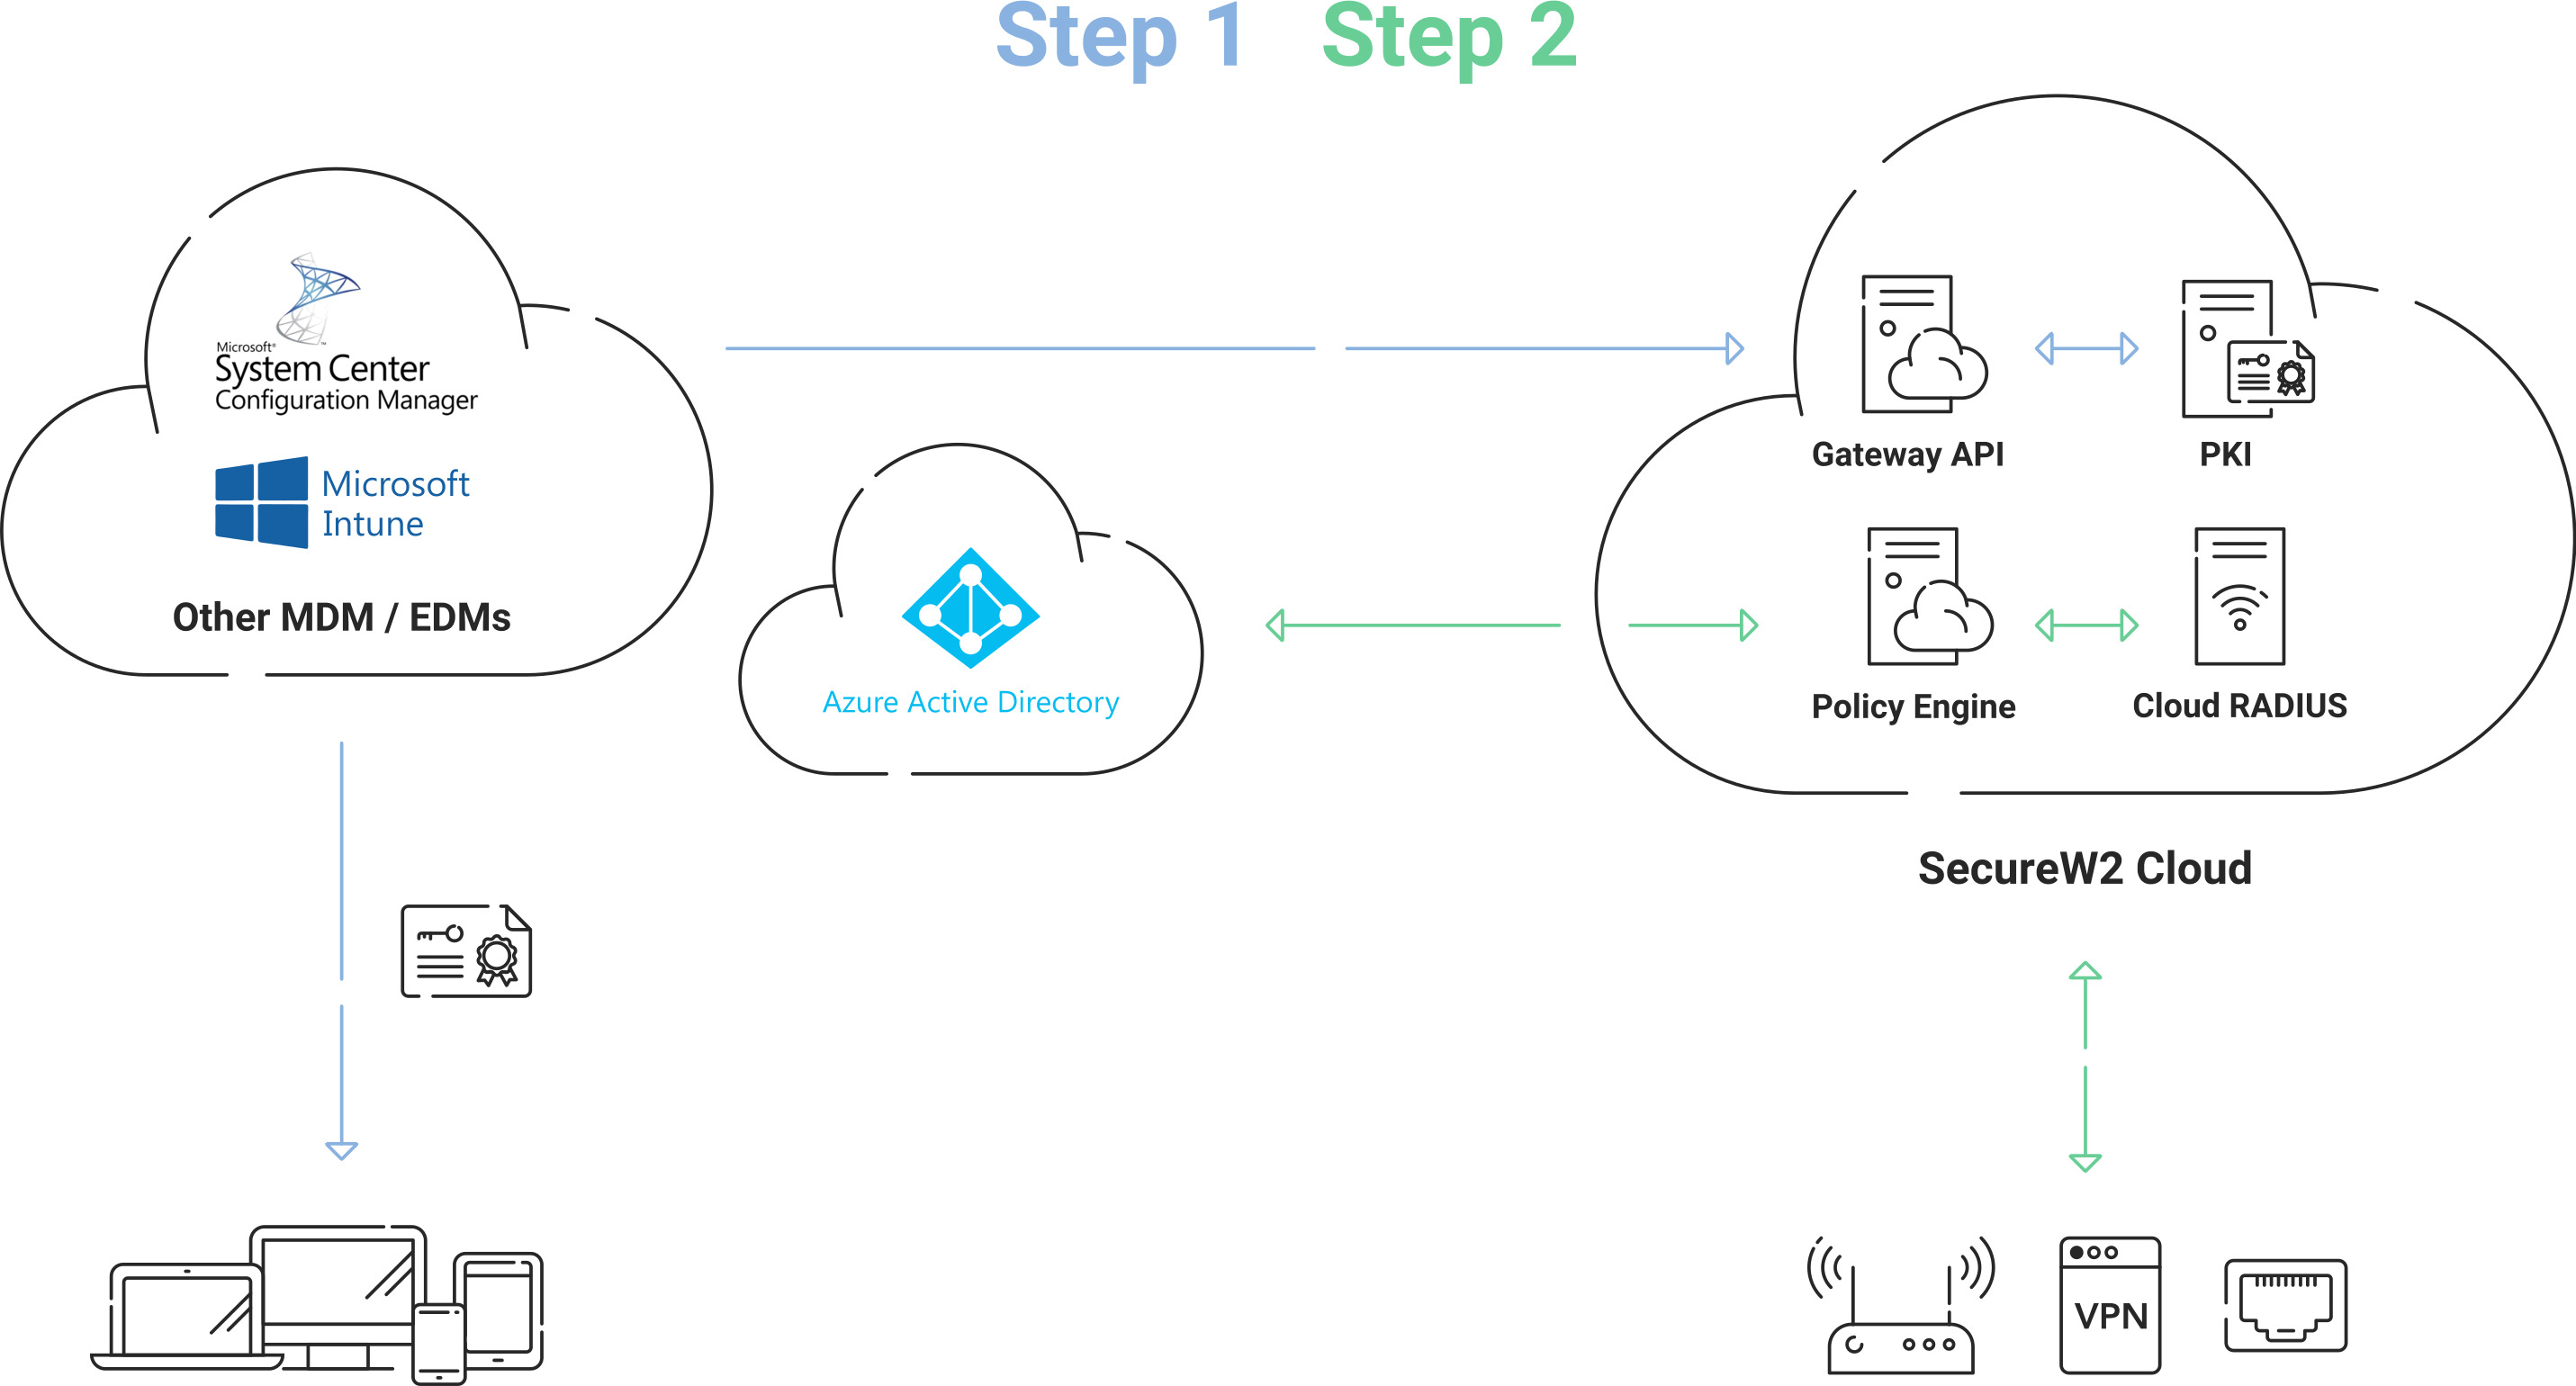
Let’s look at an example of how Azure AD is integrated with SecureW2’s PKI and RADIUS for a WPA2-enterprise network. Here’s how it’s done:
- First, tie the PKI Infrastructure to Azure AD for certificate enrollment and management.
- Then tie the RADIUS Infrastructure to Azure AD for authentication.
- Lastly, link the Device Management platform — in this case, Microsoft Intune — to SecureW2’s cloud PKI.
Configuring Managed Devices for 802.1X With Intune (Microsoft Endpoint Manager)
Configuring managed devices for 802.1X certificates and certificate-based authentication is seamless. You just have to complete these steps:
- Configure your MDM platform with SecureW2’s PKI services. Once set up, any device requesting access to your network will be sent configuration profiles for self-service of 802.1X and auto-enrollment of certificates.
- Once your managed devices are enrolled with a certificate, Cloud RADIUS will directly communicate with your Cloud IDP for real-time look-up to authenticate Wi-Fi access.
This does not require a Lightweight directory access protocol (LDAP) server. Your devices, configured for certificate-based authentication, will be authenticated by Cloud RADIUS in any major Cloud IDP to authorize access per their assigned roles defined in the IDP.
For a detailed configuration guide for MDM certificate enrollment for your Intune devices, click here.
How to Use Other MDMs for WPA2-Enterprise/802.1X
Configuring Intune for certificate deployment with Azure AD is simple because they are compatible since both are Microsoft products. However, some MDMs are not designed to include an email address in the certificate template RFC. This causes a break in the look-up process, making it impossible for admins to identify the user without the email address.
SecureW2’s JoinNow suite with certificate enrollment Gateway APIs enables auto-enrollment of devices for certificates. This solution can easily integrate with all major MDMs, such as Jamf and Kandji, to enable identity look-up integration for matching the certificates with the devices they are attached to.
Here’s a guide to integrating Azure and AD with SecureW2 for deploying certificates to enable EAP-TLS auth protocol for managing an 802.1x network in the cloud. Click here for a more detailed guide.
Unmanaged Devices/BYOD and WPA2-Enterprise/802.1X
Configuring EAP-TLS manually requires expertise that an average end-user does not have. Misconfiguring can have an adverse impact on your business. Missing server certificate validation can lead to evil twin attacks and misconfiguring EAP, to name a few, leaving your network vulnerable.
Configuring unmanaged or BYOD devices for EAP-TLS is simple and hassle-free with our JoinNow MultiOS self-service configuration solution.
When a user requests access for the first time from an unmanaged device, they run our onboarding software on the device that is customizable to change style, instructions, or which operating system to support. This is a quick process that doesn’t take more than 60 seconds.
Once the device is enrolled, the authentication with a certificate to connect to the network is automatic. Our solutions can be customized to best suit your needs, such as multiple landing pages for different types of access.
Configuring EAP-TLS Authentication for a Cloud Network
The next part of the article is a guide to configuring EAP-TLS. We will be using an Azure AD environment as an example to explain the configuration process steps that include:
-Creating an SAML application in WPA2-Enterprise
-Active Directory Integration with the Azure SAML Application
-Attribute Mapping and Policies Configuration for 802.1x Certificates
Contact us to learn more about how SecureW2 can help you set up EAP-TLS authentication. If you’d like to know how to configure EAP-TLS authentication for cloud networks, continue reading below.
Creating SAML Application in Azure for WPA2-Enterprise
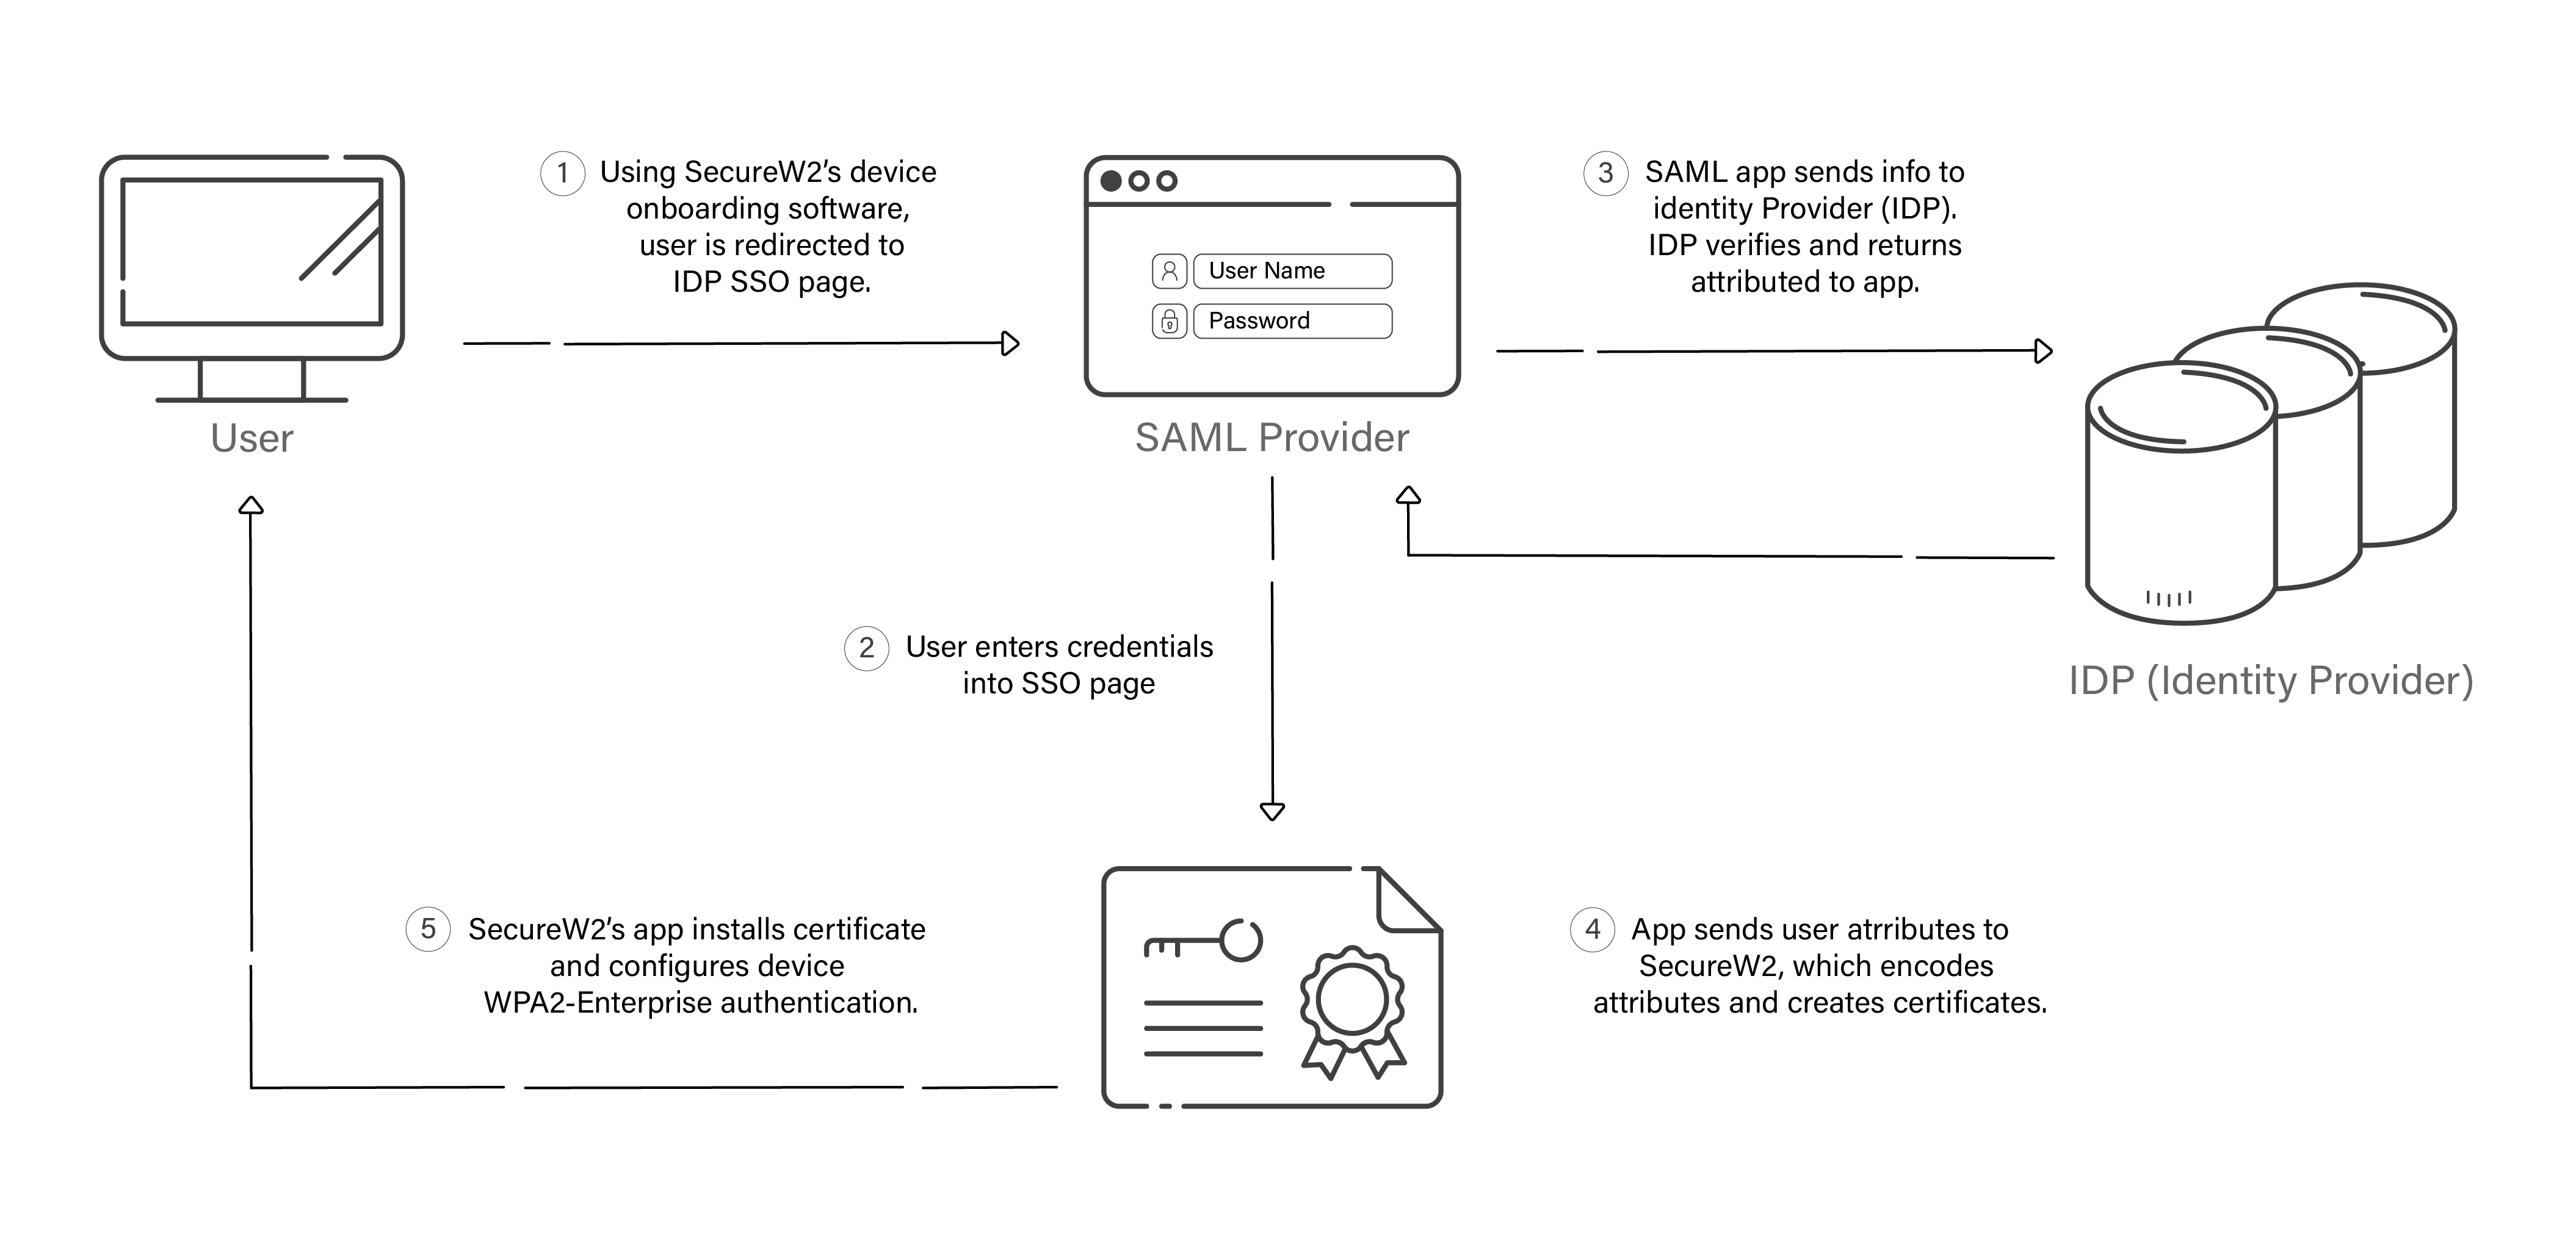
The Security Assertion Markup Language (SAML) application is a crucial component for connecting the IDP and the JoinNow MultiOS Management Portal. This is where the end users feed their credentials that are looked up in the IDP to verify the user. Once the IDP verifies the credentials, they return attributes that the SAML app shares with SecureW2’s PKI for issuing certificates.
How to Set Up SAML Application for Azure With SecureW2
- Log in to the Azure Portal.
- From the Login page, go to Enterprise Application (Type “Enterprise applications” in the search box) to create a new application.
- Click on New application in the main pane.
- Type “SecureW2 JoinNow Connector” on the Browse Azure AD Gallery page.
- Select SecureW2 JoinNow Connector, and type a name for the application in the pop-up window. Click Create.
Create an IDP in SecureW2
- Log into the JoinNow MultiOS Management Portal.
- Go to Identity Management > Identity Providers and click Add Identity Provider.
- Type a name for the provider in the Name field.
- Select SAML from the Type drop-down list.
- Select Azure from the SAML Vendor drop-down list.
- Click Save. An additional tab, Configuration, gets created once you click Save.
- Click the Configuration tab. Copy the Entity ID and ACS URL to the clipboard and save it in a word/text file. You will need this at the time of connecting with your SAML application.
The SecureW2 Cloud Connector is now ready and available to exchange information with your Azure directory.
To Configure Single-Sign-On in Azure
- In the left pane, go to Manage > Single Sign-on.
- Select SAML-based Sign-on from the Single Sign-on page.
- Click the Edit button in the Basic SAML Configuration section.
- Enter the Entity ID and ACS URL values obtained earlier. (See Creating a SAML IDP, Step 7) in the Identifier fields.
- Enter the same value as the Reply URL obtained from the ACS URL in the Sign-on URL field.
- Click Save.
- Click the DOWNLOAD button under the SAML Signing Certificates section to get the Federation Metadata XML file from Azure.
To Configure the IDP Using Azure Metadata
You will have to upload the Azure metadata to SecureW2. The steps for this process are:
- Go to Identity Management > Identity Providers in the JoinNow MultiOS Management Portal.
- Click the Edit link of the SAML IDP you created.
- Click the Configuration tab.
- Click Choose File in the Identity Provider (IDP) Info section to select the Metadata XML file downloaded from Azure.
- Click Upload.
Active Directory Integration With the Azure SAML Application
Now that your SAML Application is configured in Azure and SecureW2, you can start assigning users. You can assign the users directly, or you can integrate with your Active Directory to refer to the database from there. Let’s take a look at the steps in this process.
Adding Users to the SAML Application
- Go to the JoinNow Connector Application or the newly created SAML application in the “Create an SAML Application in Azure” section from Microsoft Azure Portal.
- Next, go to Manage > Users and groups.
- Click Add User.
- Use the Select field from the Users and groups pane to search for the user by name or email.
- Click Assign in the Add Assignment pane.
- Go to Manage > Users and groups to create groups.
- In the search box, type “Groups” and click Groups.
- Click + New group to add a new group.
- Select Security from the Group type drop-down list.
- Type a suitable name for the group in the Group name field.
- Type a description for the group in the Group description field.
- Select Assigned from the Membership type drop-down.
- Click No members selected in the Members field.
- Search for one or more members in the Add members window. Choose the member(s) from the list and click Select. The selected members are now added to the group.
- Click Create.
- To create additional groups and add members, repeat steps 4-9.
- Search for the group(s) created on the screen and copy the Object ID(s) of the group/groups to the clipboard and save it in a Word/text file.
Granting Your SAML Application Access to Active Directory
- Use the search feature from the Microsoft Azure Portal to go to App registrations.
- Click the dropdown next to the search field and select All apps to display the list of all available applications.
- Click the application you want.
- Scroll under Manage and click API Permissions from the pane of your application.
- Click Add a Permission under Configured Permission.
- Select Microsoft Graph and Delegated Permission from the Request API permissions pane.
- Select the following permissions:
- Directory.Read.All
- Group.Read.All
- User.Read.All
- Click Add Permissions.
- Click Settings in the pane for your application.
- Click Manifest > Edit.
- In the Edit manifest pane, in the source code:
- Change the value to ‘All’ for the ‘groupMembershipClaims‘ variable.
- Click Save.
Attribute Mapping and Policies Configuration for 802.1x Certificates
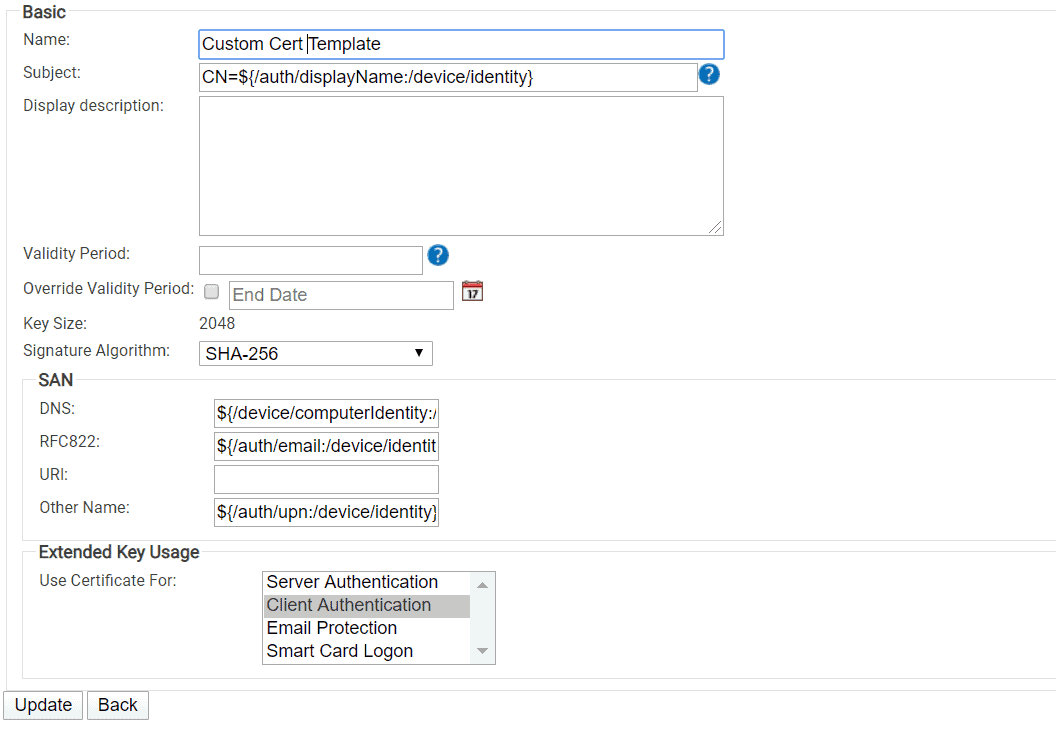
This is one of the most crucial stages for network segmentation and for designing the foundation for identity context. Each certificate can be assigned attributes that contain information about the user’s identity, such as their role and level of access. Let’s look at how these attributes are sent to SecureW2 to be included in the certificate template and how to configure policies in the management portal.
Attribute Mapping Configuration in SecureW2
- Go to Identity Management > Identity Providers from the SecureW2 Management Portal.
- In the IDP you created in the section “Create an Identity Provider in SecureW2”, click Edit.
- Select the Attribute Mapping tab.
- Click Add.
- Enter ‘upn‘ for Local Attribute.
- Select USER_DEFINED from the Remote Attribute dropdown.
- In the field that appears, enter ‘http://schemas.xmlsoap.org/ws/2005/05/identity/claims/name‘.
- Click Next.
- Click Add.
- Enter ‘email‘ for Local Attribute.
- Select USER_DEFINED from the Remote Attribute dropdown.
- In the field that appears, enter ‘http://schemas.xmlsoap.org/ws/2005/05/identity/claims/emailaddress‘
- Click Next.
- Click Add.
- Enter ‘displayName‘ for Local Attribute.
- Select USER_DEFINED from the Remote Attribute dropdown.
- In the field that appears, enter ‘http://schemas.microsoft.com/identity/claims/displayname‘
- Click Next.
- Select the Basic tab.
- For Group Map Attribute, enter ‘http://schemas.microsoft.com/ws/2008/06/identity/claims/groups‘.
- Select the Groups tab.
- Click Add.
- Enter a name for the Local Group.
- Log into your Microsoft Azure Portal in a new browser tab/window, and go to Azure Active Directory > Groups > All groups.
- To search for the group, use the Name field
- Click the group, and then go to Properties.
- Copy the value for Object ID.
- Return to your SecureW2 Management Portal.
- For Remote Group, paste the Object ID value.
- Click Create.
- Click Update.
Updating Profile Policy in SecureW2
- Go to Policy Management > Profile from your SecureW2 Management Portal.
- Click Edit profile policy.
- Select the Settings tab.
- Select the IDP you created from the Identity Provider dropdown.
- Click Update.
Updating User Role Policy in SecureW2
- Go to Policy Management > User Roles from the SecureW2 Management Portal.
- Click Edit DEFAULT ROLE POLICY 1.
- Select the Conditions tab.
- Select the IDP you created from the Identity Provider dropdown.
- Click Update.
Adding a User Role Policy in SecureW2
- Go to Policy Management > User Roles, and click Add Role.
- In the Name field, enter a name.
- Click Save. You will be directed to the Conditions tab.
- Select the Identity provider created in section 1.2 from the Identity Provider drop-down.
- Click Update.
Adding an Enrollment Policy in SecureW2
- Go to Enrollment, and click Add Enrollment Policy.
- Enter a name in the Name field, and click Save.
- For the User Role list in the Conditions tab, select the user role you created in the previous section.
- Select the DEFAULT DEVICE ROLE policy or a policy you created in the Device Role list.
- Click Update.
Republishing Your Network Profile
- Go to Device Onboarding > Network Profiles, and click Publish or Republish if it is already published. This may take about 60 to 90 seconds.
- Click View once published.
- Click the JoinNow button to download a Wi-Fi wrapper package.
- Open the downloaded file to enter your Azure credentials once the system prompts.
- Check if enrollment is successful when the system tries to enroll and connect.
NOTE: If you encounter any issues with your setup, please contact us at support@securew2.com.
Easily Implement Passwordless EAP-TLS for Your Cloud Network With SecureW2
Using credential-based authentication is almost obsolete and fails to add value in a complex environment where users are logging in from multiple locations. Using certificates to configure the EAP-TLS authentication protocol helps protect your network from both external and internal threats to your network. It also lays the foundation for identity context-based authentication.
SecureW2’s industry-leading solutions make creating a WPA2-Enterprise efficient and easy. Our Cloud RADIUS is designed with EAP-TLS, and the built-in PKI solution automates the entire certificate management process to help make your network more secure. We are a vendor-neutral company, and our products integrate well with all major MDMs and IDPs to provide you with a seamless authentication experience for your managed, BYOD, and IoT devices and help you move your network to the cloud. Click here to learn about our pricing.