Sync AD to Google for Cloud Authentication
A K-12 IT environment is often complicated because of the wide range of machines that come under its network purview, from managed Chromebooks to unmanaged BYOD devices. Additionally, managing multiple applications used in the school environment and the school districts not being limited to a single location makes it a highly complex ecosystem.
The use of Active Directory is not so practical for a K-12 environment because it fails to provide single-sign-on (SSO) and is not the most effective for managing cross-platform systems. This often leads to IT administrators manually assigning devices and working on onboarding and onboarding of users, which is an activity that witnesses more activity than other offices due to enrollment and transfers of students.
In this article, we will look at how to extend AD Identities to the Google Cloud Platform, if the transition from AD to Azure AD is viable, and if the integration of AD with Google is possible.
Extend Active Directory Identities to Google
You already have an on-premise infrastructure for IAM (Identity Access Management) for your group management and role-based access management. It has already been signed off by your auditor and the Internal Security team, with everything functioning on point. The question that must be on your mind is: is it feasible to extend your existing on-prem Identity Access Management (IAM) to GCP (Google Cloud Platform). And when doing so, will it be possible to leverage the investments made on the existing on-prem architecture?
Yes, on-premise AD groups used for IAM can be easily extended to Google resources. Using the existing group membership management workflows, you can have your users and groups from the on-prem IDP extended to GCP. If you have a domain controller like Okta or Google Workspace in your on-prem environment, you can configure single sign-on (for your on-prem AD users) for all the platforms and applications in Google. You can continue using your existing SAML-based Identity Provider (IDP).
In GCP, you can provide role-based access management to control which user or machine has access to which application or platform. You can enable this by
- Syncing your users and groups from on-prem AD to a GC Identity domain.
- Setting up your Google Cloud identity domain to indicate that you would like the authentication of those users to happen with your on-prem federation endpoint.
Let’s briefly look at how to sync Active Directory to GCP.
- Create Administrator User Account
- Create an Active Directory for User provisioning
- Install Google Cloud Directory Sync
- Creating a Folder for Configuration
- Connecting to Google
- Connecting to Active Directory
- Decide What to Provision
- User Provisioning
- Group Provisioning
You can find the detailed process steps in the later part of this article.
Is Transitioning from AD to Azure AD a Viable Option?
The scope and methods for handling identity and access management are changing drastically, with organizations moving from on-premises to cloud-based solutions. Azure AD does help sync on-prem to Microsoft 365. However, it is greatly limited when it comes to supporting a WPA2-enterprise Wi-Fi.
Azure AD was created to help transition from on-premise AD to connect to cloud services like Microsoft 365. Azure AD, in that sense, was presented as a more accessible recourse to Active Directory Federation Services (ADFS), a single sign-on on-premises identity service designed by Microsoft for enabling sharing of identity information outside an organization’s network.
ADD allows a common identity for Azure, M365, Intune, and other Microsoft cloud products (that permits SSO and multi-factor authentication (MFA) within the Microsoft ecosystem). However, the cost involved in moving to cross-domain SSO and MFA is often high as they are subscription-based services provided by on-prem AD at no extra cost. Microsoft also does not provide cloud Public Key Infrastructure (PKI) or Certificate Authority (CA) services and does not integrate well with major IAM authentication protocols, including LDAP and RADIUS. Organizations, therefore, are often left with no other alternative than to continue managing AD domain hardware, which can be expensive.
Can I sync Google to Azure AD?
The answer is yes. You can sync Google to Azure AD to manage the identities of your on-prem AD, Azure AD, and Google workspace through a single portal. This hybrid setup allows user provisioning and single sign-on (SSO) between a Microsoft Azure Active Directory (AD) tenant and your Google Workspace or Cloud Identity account.
Upon completion of delegating Google cloud identity management to Azure AD, you can redirect the Student Information System’s (SIS) synchronization from Google to either Azure AD or your on-prem AD. Your organization’s Identity Provider (IDP) continues to store the passwords of your users. Instead of Google sign-in screen, your users can sign in from their ChromeOS devices from an Azure authentication page. Signing in is almost the same as a browser sign-in to a Google Workspace account through Security Assertion Markup Language (SAML) SSO.
You will, however, have to continue using on-prem AD solutions to manage the Active Directory Certificate Services and Network Policy Servers (NPS). This means you keep incurring the expenses that are involved in managing on-prem solutions like
- Inventory management of hardware
- Continual upgrades and licensing costs,
- The time and effort needed to manage on-prem servers
Additionally, the use of this mix of cloud and on-premises solutions also comes with challenges like disconnected admin interfaces. Especially in a K-12 environment, where
- It is a mix of managed and unmanaged devices
- There is a vast number of users that use multiple devices to connect to the network
- The need for managing access to multiple applications and platforms
- There is a need for updating student accounts multiple times a year
- Limited budget for IT infrastructure and management
This makes account management even more complex and can cause unnecessary stress on the already constricted budget that school districts usually have to manage with.
RADIUS Authentication in the Cloud
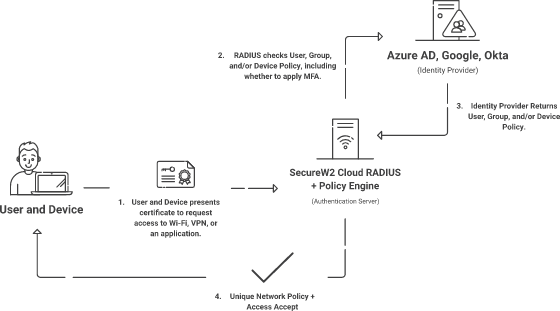
Active Directory is no longer a viable solution because of its limitations and challenges due to the on-prem solution. The complex K-12 network with multiple locations and types of devices (both managed and unmanaged) and an environment where there are constant changes that need to be made to user access requires a solution that can meet all its needs. Syncing AD to Google for cloud authentication does help. However, the need to continue managing on-prem solutions for AD CS or NPS still makes it a complex solution that requires a lot of manual work and involves the expenses that come with on-prem servers.
You can eliminate the hassle of managing on-prem servers ultimately with SecureW2 solutions. Our Cloud RADIUS is the industry’s only passwordless authentication solution that is designed to work natively with cloud Identities like Azure, Okta, and Google. With SecureW2, there is no need for LDAP or AD servers. Our cloud RADIUS solutions will help with
- Real-time native OAuth integration for policy enforcement using Azure AD, Okta, & Google Workspace.
- Help you go passwordless with digital certificates.
- Network security based on user, group, attributes, device, and conditional access policies for Wi-Fi, Wired, and VPN that can be enforced dynamically.
Talk to our experts to know more about our solutions.
How to Sync Active Directory to Google Cloud Platform (GCP)
Create an Administrator User Account
The first step is creating a user account with administrative privileges for Google Cloud Directory Sync (GCDS). This account allows GCDS to facilitate the interaction between the Directory API and Domain Shared Contacts API of Cloud Identity and Google Workspace. Although you already created one super-admin user at the time of signing up for Cloud Identity or Google Workspace, it is better to create a separate user that is exclusively used by Cloud Directory Sync. The steps are as follows:
- Open the Admin console and sign in using the super-admin user account (you created this account when signing up for Cloud Identity or Google Workspace).
- In the menu section, click Directory > Users and then click on Add new user.
- Feed in the name and email address that best suits your need. (Include the primary domain in the email address, even if the forest you’re provisioning from does not match the domain).
- Please enter a new password manually. To do this, disable Automatically generate a new password.
- Disable Ask for a password change at the next sign-in.
- Click Add New User and then click on Done.
Next, change the status of the Admin Account to a Super Admin. You will need to do this to handle user accounts and group management activities like creating, listing, and deleting. As a fail-safe to enable re-authorization of GCDS (in case of any issues with single sign-on), exempt this user from single sign-on. The steps are as follows.
- Open the newly created user from the list.
- Click Assign Roles under Admin Roles and Privileges.
- Enable the Super Admin role.
- Click Save.
Create an Active Directory user for User Provisioning
Create a dedicated domain user account that can retrieve information about users and groups from Active Directory instead of using the existing Windows user. The steps to create the domain account are as follows.
Graphical Interface
- From the Start Menu, go to the Active Directory Users and Computers MMC snap-in.
- Go to the domain and organizational unit you want to create the user. In case of multiple domains in your forest, create the user in the same domain as the GCDS machine.
- Right-click on the right window pane to select New > User.
- Feed in the name and email address best suits your need and click Next.
- Provide a password as per your company’s password policy.
- Clear the field User must change password at next logon.
- Select the option Password never expires.
- Click Next, and then Finish.
PowerShell
- Open a PowerShell console as Administrator.
- To create a user run the command given below:
New-ADUser -Name “Google Cloud Directory Sync” -GivenName "Google Cloud"-Surname “Directory Sync” -SamAccountName "gcds"-UserPrincipalName (-Join(“gcds@”,(Get-ADDomain).DNSRoot)) -AccountPassword(Read-Host -AsSecureString "Type password for User")-Enabled $True |
Please Note: Use the “Path” argument to create a user under a particular organizational unit (OU). For example: -Path “OU=dest,OU=root,DC=domain,DC=com”.
You are now ready to install GCDS.
Installing Google Cloud Directory Sync (GCDS)
To install GCDS, download the installer on the machine where you will run GCDS. You can use the PowerShell command instead of downloading the installer from a browser.
| (New-Object net.webclient).DownloadFile(“https://dl.google.com/dirsync/dirsync-win64.exe”, “$(pwd)\dirsync-win64.exe”) |
Run the following command to launch the installation wizard.
| .\dirsync-win64.exe |
If you have GCDS already installed in your system, it is recommended to update the same to ensure you have the latest version installed.
Creating a Folder for Configuration
You must secure the folder (configuration is stored in an XML file) used for configuration because it includes the OAuth refresh token that GCDS uses for authenticating with Google. Other than this folder, GCDS does not require access to local resources. You can configure GCDS to run as a limited user.
- Sign in with a domain or local admin user from the machine where you installed GCDS.
- Open a PowerShell console (that has admin privileges).
- To apply an access control list (ACL) so that only GCDS and admins have access, you will need to store the configuration. Run the following commands to create a folder named $Env:ProgramData\gcds
| $gcdsDataFolder = “$Env:ProgramData\gcds” New-Item -ItemType directory -Path $gcdsDataFolder &icacls “$gcdsDataFolder” /inheritance:r &icacls “$gcdsDataFolder” /grant:r “CREATOR OWNER:(OI)(CI)F” /T &icacls “$gcdsDataFolder” /grant “BUILTIN\Administrators:(OI)(CI)F” /T &icacls “$gcdsDataFolder” /grant “Domain Admins:(OI)(CI)F” /T &icacls “$gcdsDataFolder” /grant “LOCAL SERVICE:(OI)(CI)F” /T |
4. Run the command Write-Host $Env:ProgramData to identify the location of the ProgramData folder. For English versions of Windows, this path will usually be c:\ProgramData. You will need this path later.
Connecting to Google
The next step is to employ Configuration Manager to prepare the GCDS configuration. The following steps are to be deployed when running Configuration Manager on the same server that you are going to run the GCDS. If you use a different system to run Configuration Manager, ensure that you copy the configuration file to the GCDS server afterward. You should, however, keep in mind that using a different machine for testing the configuration might not be possible.
- Launch Configuration Manager. For Windows, go to the Start menu under Google Cloud Directory Sync > Configuration Manager.
- Click Google Domain Configuration > Connection Settings.
- Authorize GCDS and configure domain settings.
- Click File > Save as in the menu.
- In the file dialog, enter PROGRAM_DATA\gcds\config.xml as the filename. Replace PROGRAM_DATA with the path to the ProgramData folder that the PowerShell command returned when you ran it earlier.
- Click Save, and then click OK.
Connecting to Active Directory
Please follow the following step to configure GCDS to connect to Active Directory:
- Go to Configuration Manager and click LDAP Configuration > Connection Settings.
- The steps to configure the LDAP connection settings are:
- For Server Type: Select MS Active Directory.
- Connection Type: Select either LDAP+SSL or Standard LDAP.
- Host Name: Enter the name of a GC server here. This setting is used only for testing environments, and so you will automate the discovery of the GC server later.
- Port: 3268 (GC) or 3269 (GC over SSL). The use of a GC server instead of a domain controller will help ensure you provision users from all the domains of your Active Directory forest. Please ensure Microsoft ADV190023 is updated before authentication.
- Authentication Type: Simple.
- Authorized User: Enter the User Principal Name (UPN) that you created earlier for the domain user gcds@UPN_SUFFIX_DO. Replace UPN_SUFFIX_DOMAIN with the appropriate UPN suffix domain for the user. You can also use the NETBIOS_DOMAIN_NAME\gcds syntax to specify the user.
- Base DN: This field is to be left empty so that searches are performed across all domains in the forest.
- Click Test connection to verify the settings. In case of connection failure, double-check if the hostname you have specified is of a GC server and ensure that the username and password you input are correct.
- Click Close.
Decide What to Provision
Once you are connected to Google cloud, you can decide what items you want to provision.
- Click General Settings from Configuration Manager.
- Select the appropriate User Accounts.
- To provision groups, select Groups. If you do not wish to provision groups, clear the checkbox.
- Leave Organizational Units unselected (Synchronizing organizational units is not a part of this guide)
- User Profiles and Custom Schemas are to be left unselected.
User Provisioning
Configuring user mappings
Next, you can configure user mapping between Active Directory. The steps are as follows:
- Click User Accounts > Additional User Attributes in Configuration Manager
- To automatically populate the attributes for Given Name and Family Name with givenName and sn, respectively, click Use defaults.
The rest of the settings depend on what attributes (UPN or email address) you want to use to map Active Directory to users in Cloud identity. This will also determine if you need to apply domain name substitutions.
Configuring Using UPN
- Click User Accounts > User Attributes in Configuration Manager.
- Click Use defaults.
- Change the Email Address Attribute to userPrincipalName.
- Click proxyAddresses > Clear if you don’t want alias addresses synced.
- Click the Search Rules, and then click Add Search Rule tab.
- Enter the following settings:
- Scope: Sub-tree
- Rule:
| (&(objectCategory=person)(objectClass=user)(!(userAccountControl:1.2.840.113556.1.4.803:=2))(!(userPrincipalName=gcds@*))) |
0 Base DN: To search all domains in the forest, leave this section blank
7. Click OK to complete the rule creation.
UPN Domain Substitution
- Click Google Domain Configuration > Exclusion Rules in Configuration Manager.
- Click Add Exclusion Rule.
- Configure the following settings:
- Type: User Email Address
- Match Type: Regular Expression
- Exclusion Rule: To use a single UPN suffix domain, enter the following regular expression:
| .@((?!SUBSTITUTION_DOMAIN).)$ |
As given in the below example, replace SUBSTITUTION_DOMAIN with the domain that you use to replace the UPN suffix domain:
| .@((?!corp.example.com).)$ |
4. Click OK to complete the rule creation.
- Click Google Domain Configuration > Exclusion Rules in Configuration Manager.
- Click Add Exclusion Rule.
- Configure the following settings:
- Type: User Email Address
- Match Type: Regular Expression
- Exclusion Rule: To use a single UPN suffix domain, enter the following regular expression:
| .@((?!MX_DOMAIN).)$ |
As shown in the example below, replace MX_DOMAIN with the domain name that you use in email addresses:
| .@((?!corp.example.com).)$ |
To use more than one UPN suffix domain, extend the expression as shown below:
| .@((?!corp.example.com|branch.example.com).)$ |
4. Click on OK for completing the rule creation.
Email Domain Substitution
- Click Google Domain Configuration > Exclusion Rules in Configuration Manager
- Click Add Exclusion Rule.
- Configure the following settings:
- Type: User Email Address
- Match Type: Regular Expression
- Exclusion Rule: To use a single UPN suffix domain, enter the following regular expression:
| .@((?!SUBSTITUTION_DOMAIN).)$ |
Replace SUBSTITUTION_DOMAIN with the domain that you use to replace the email domain, as shown in the below example:
| .@((?!corp.example.com).)$ |
4. Click OK to complete the rule creation.
Group Provisioning
The next step is to configure the mapping of groups between Active Directory and Cloud Identity. Based on how you plan to map groups (common name or email address), the steps are different.
Group mappings with Common Name
To start, identify the types of security groups that you want to provision, and then formulate an appropriate LDAP query for the same. Below are some common queries that can be used.
| Types of Security Groups | LDAP Query |
| Domain Local Groups | (&(objectCategory=group)(groupType:1.2.840.113556.1.4.803:=2147483652)) |
| Global Groups | (&(objectCategory=group)(groupType:1.2.840.113556.1.4.803:=2147483650)) |
| Universal Groups | (&(objectCategory=group)(groupType:1.2.840.113556.1.4.803:=2147483656)) |
| Global & Universal Groups | (&(objectCategory=group)(|(groupType:1.2.840.113556.1.4.803:=2147483650)(groupType:1.2.840.113556.1.4.803:=2147483656))) |
| All Groups | (objectCategory=group) |
The query for global groups include Active Directory–defined groups like domain controllers. To filter these groups per your needs, restrict the search by organizational unit (ou).
Depending on whether you use UPN or email address to map Active Directory to users in Cloud Identity, the next steps are as follows.
Steps for E-mail
- Click Groups > Search Rules in Configuration Manager.
- To add default rules, click on Use Defaults.
- Click the first rule edit icon.
- Edit Rule to replace with the LDAP query you want to use.
- Edit Group Email Address Attribute to enter the setting cn in the Groups box.
- Click OK.
Steps for UPN
- Click Groups > Search Rules in Configuration Manager.
- To add two default rules, click Use Defaults.
- Click the first rule edit icon.
- Edit Rule to replace the LDAP query you want to use.
- In the Groups box, enter the following settings:
- Group Email Address Attribute: cn
- User Email Name Attribute: userPrincipalName
- Click the Prefix-Suffix tab.
- In the Group Email Address box, enter the following settings:
- Suffix: @PRIMARY_DOMAIN, where you replace @PRIMARY_DOMAIN with the primary domain of your Cloud Identity. The settings must be specified to prevent multiple Google Cloud Directory Sync instances from erasing group members that they had not added.
- Example: @example.com
- Click OK.
- Click the second rule cross icon to delete that rule.
The same settings will apply if you used domain substitution to map users.
Group Mappings with E-mail Address
To do this; first, you need to determine the types of security groups you want to provision and then formulate the suitable LDAP query. Some of the common queries that you can use are.
| Type of Groups (with E-mail Address) | LDAP Query |
| Domain local groups with email address | (&(objectCategory=group)(groupType:1.2.840.113556.1.4.803:=2147483652)(mail=*)) |
| Global groups with email address | (&(objectCategory=group)(groupType:1.2.840.113556.1.4.803:=2147483650)(mail=*)) |
| Universal groups with email address | (&(objectCategory=group)(groupType:1.2.840.113556.1.4.803:=2147483656)(mail=*)) |
| Global and universal groups with email address | (&(objectCategory=group)(|(groupType:1.2.840.113556.1.4.803:=2147483650)(groupType:1.2.840.113556.1.4.803:=2147483656))(mail=*)) |
| All groups with email address | (&(objectCategory=group)(mail=*)) |
The following settings differ depending on whether you use UPN or email address for mapping. The steps for both are as follows:
- Click Groups > Search Rules in Configuration Manager.
- To add default rules, click Use Defaults.
- Click the first rule edit icon.
- Edit the Rule to replace the LDAP query.
- Click OK.
- Click the second rule cross icon to remove this rule.
UPN
- Click Groups > Search Rules in Configuration Manager.
- To add default rules, click Use Defaults.
- Click the first rule edit icon.
- Edit the Rule to replace the LDAP query.
- In the Groups box, edit User Email Name Attribute to enter the setting userPrincipalName.
- Click OK.
- Click the second rule cross icon to delete that rule.
Replace domain names in LDAP email addresses with this domain name, which will also be applicable to email addresses of groups as well as members.
Deletion Policy
Deletion policy in the Googe cloud is similar for groups and users. It’s important to ensure that different GCDS instances don’t interfere with one another when multiple separate instances of Google cloud are used in provisioning different domains or forests to a single Cloud Identity account.
A group member in Cloud Identity that has been provisioned from a different source will by default, be identified in Active Directory as a member that has been deleted. To avoid this, configure GCDS to ignore the group members that are outside the range of the domain or forest that you are provisioning from.
UPN
- Click Google Domain Configuration > Exclusion Rules.
- Click Add Exclusion Rule.
- Configure the following settings:
- Type: Group Member Email Address
- Match Type: Regular Expression
- Exclusion Rule: If you use a single UPN suffix domain, enter the following regular expression:
| .@((?!UPN_SUFFIX_DOMAIN).)$ |
Replace UPN_SUFFIX_DOMAIN with your UPN suffix domain, like the example below:
| .@((?!corp.example.com).)$ |
To use more than one UPN suffix domain, extend the expression as below:
| .@((?!corp.example.com|branch.example.com).)$ |
4. Click OK to create the rule.
UPN Domain Substitution
- Click Google Domain Configuration > Exclusion Rules.
- Click Add Exclusion Rule.
- Configure the following settings:
- Type: Group Member Email Address
- Match Type: Regular Expression
- Exclusion Rule: If you use a single UPN suffix domain, enter the following regular expression:
| .@((?!SUBSTITUTION_DOMAIN).)$ |
Replace SUBSTITUTION_DOMAIN with the domain that you use to replace the UPN suffix domain, like in this example:
| .@((?!corp.example.com).)$ |
4. Click OK to create the rule.
Configure Logging and Notifications
To keep users in sync, you need to schedule GCDS runs. Control how and when GCDS writes its log file o keep track of GCDS activity and any potential problems.
- Click Logging in Configuration Manager.
- Set File name to PROGRAM_DATA\gcds\gcds_sync.#{timestamp}.log. Replace PROGRAM_DATA with the path to the ProgramData folder that the PowerShell command returned when you ran it earlier.
- Click File > Save to execute the configuration modifications, and then click OK.
| Note: You can click File > Save or Save as when you complete each individual step mentioned above. You can click Go to the simulation tab If it is ready to be tested. Or you can click Skip simulation. |
GCDS can also send email notifications too. Click Notifications and provide connection information for your mail server to activate email notifications.
User Provisioning Simulation
The GCDS configuration is now complete, and you need to simulate a user provisioning run to confirm the configuration is working as you want it to. To do the simulation, first, save the configuration to disk and then run a simulation. GCDS does not execute changes to your Cloud Identity account during the simulation. Instead, it will report the changes it will perform during a regular provision run.
- Click Sync in Configuration Manager.
- Select Clear cache (bottom of the screen), and then click Simulate sync.
- Once the process is complete, check the Proposed changes section of the log (in the lower half of the dialog) to confirm there are no suggested changes you don’t want, like suspending or deleting users or groups.
Initial user provisioning
To initiate a provision run, follow the below steps:
- Click Sync in Configuration Manager.
- Select Clear cache (bottom of the screen) and click Sync & apply changes. A dialog will appear with the status.
- After the process is completed, check the log (in the lower half of the dialog):
- Under Successful user changes, check to confirm that a minimum of one user has been created.
- Under Failures, confirm that no failures have emerged.
Scheduling
Schedule a task to initiate a provisioning run every hour to confirm that changes implemented in Active Directory are getting replicated to your Cloud Identity.
- Log in as an administrator and Open a PowerShell console.
- Check to confirm that the Active Directory PowerShell module is installed on the system:
| import-module ActiveDirectory |
Download and install the Remote Server Administration Tools to try again if the command fails.
- Create a Notepad file, and copy the content below into it. Next, save the file to %ProgramData%\gcds\sync.ps1. Close the file once you are done.
| [CmdletBinding()] Param( [Parameter(Mandatory=$True, Position=1)] [string]$config, [Parameter(Mandatory=$True, Position=1)] [string]$gcdsInstallationDir) import-module ActiveDirectory Stop on error. $ErrorActionPreference =”stop” Ensure it’s an absolute path. $rawConfigPath = [System.IO.Path]::Combine((pwd).Path, $config) Discover closest GC in current domain. $dc = Get-ADDomainController -discover -Service “GlobalCatalog” -NextClosestSite Write-Host (“Using GC server {0} of domain {1} as LDAP source” -f [string]$dc.HostName, $dc.Domain) Load XML and replace the endpoint. $dom = [xml](Get-Content $rawConfigPath) $ldapConfigNode = $dom.SelectSingleNode(“//plugin[@class=’com.google.usersyncapp.plugin.ldap.LDAPPlugin’]/config”) Tweak the endpoint. $ldapConfigNode.hostname = [string]$dc.HostName $ldapConfigNode.ldapCredMachineName = [string]$dc.HostName $ldapConfigNode.port = “3268” # Always use GC port Tweak the tsv files location $googleConfigNode = $dom.SelectSingleNode(“//plugin[@class=’com.google.usersyncapp.plugin.google.GooglePlugin’]/config”) $googleConfigNode.nonAddressPrimaryKeyMapFile = [System.IO.Path]::Combine((pwd).Path, “nonAddressPrimaryKeyFile.tsv”) $googleConfigNode.passwordTimestampFile = [System.IO.Path]::Combine((pwd).Path, “passwordTimestampCache.tsv”) Save resulting config. $targetConfigPath = $rawConfigPath + “.autodiscover” $writer = New-Object System.IO.StreamWriter($targetConfigPath, $False, (New-Object System.Text.UTF8Encoding($False))) $dom.Save($writer) $writer.Close() Start provisioning. Start-Process -FilePath “$gcdsInstallationDir\sync-cmd” ` -Wait -ArgumentList “–apply –config “”$targetConfigPath””” |
4. A secret key is created by the Configuration Manager to encrypt the credentials in the config file. Run the command below to copy the secret key to the profile of NT AUTHORITY\LOCAL SERVICE. This needs to be done so that Google cloud can read the configuration at the time of running a scheduled task.
| New-Item -Path Registry::HKEY_USERS\S-1-5-19\SOFTWARE\JavaSoft\Prefs\com\google\usersyncapp -Force; Copy-Item -Path Microsoft.PowerShell.Core\Registry::HKEY_CURRENT_USER\SOFTWARE\JavaSoft\Prefs\com\google\usersyncapp\util ` -Destination Microsoft.PowerShell.Core\Registry::HKEY_USERS\S-1-5-19\SOFTWARE\JavaSoft\Prefs\com\google\usersyncapp\util |
Check if you have opened PowerShell console as Administrator if you get a command failure notification.
- Run the following command to create a scheduled task. This task will be initiated every hour and it conjures the sync.ps1 script as NT AUTHORITY\LOCAL SERVICE.
| $taskName = “Synchronize to Cloud Identity” $gcdsDir = “$Env:ProgramData\gcds” $action = New-ScheduledTaskAction -Execute ‘PowerShell.exe’ -Argument "-ExecutionPolicy Bypass -NoProfile $gcdsDir\sync.ps1 -config $gcdsDir\config.xml -gcdsInstallationDir '$Env:Programfiles\Google Cloud Directory Sync'"-WorkingDirectory $gcdsDir $trigger = New-ScheduledTaskTrigger -Once-At (Get-Date) -RepetitionInterval (New-TimeSpan -Minutes 60)-RepetitionDuration (New-TimeSpan -Days (365 * 20)) $principal = New-ScheduledTaskPrincipal -UserID “NT AUTHORITY\LOCAL SERVICE” -LogonType ServiceAccount Register-ScheduledTask -Action $action -Trigger $trigger -Principal $principal -TaskName $taskName $task = Get-ScheduledTask -TaskName “$taskName” $task.Settings.ExecutionTimeLimit = “PT12H” Set-ScheduledTask $task |
User Provisioning Testing
Installation and configuration of GCDS is now complete with the scheduled task will be triggering a provision run every hour. If you want to initiate a provisioning run manually, run the following command from the PowerShell console.
| Start-ScheduledTask “Synchronize to Cloud Identity” |
Uninstalling GCDS
The following steps will help you uninstall GCDS.
- Click Programs > Uninstall a program from Windows Control Panel.
- To launch the uninstall wizard, go to Google Cloud Directory Sync, click Uninstall/Change and follow the instructions provided in the wizard.
- Run the following command from the PowerShell console to terminate the scheduled task:
| $taskName = “Synchronize to Cloud Identity” Unregister-ScheduledTask -TaskName $taskName -Confirm:$False |
4. The following command will delete the configuration and log files.
| Remove-Item -Recurse -Force “$Env:ProgramData\gcds” Remove-Item -Recurse -Path Registry::HKEY_USERS\S-1-5-19\SOFTWARE\JavaSoft\Prefs\com\google\usersyncapp |