Configure JAMF SCEP Profile For CBA
Simple Certificate Enrollment Protocol (SCEP) is a standard for certificate management. SCEP is predominantly used for certificate-based authentication. A Mobile device management (MDM) solution uses SCEP to push the payload that houses the SCEP URL and the shared secret to managed devices in the network.
The significant advantages of certificate-based authentication are:
- Minimal to zero trust as users are authenticated through digital certificates.
- Data is encrypted using certificates to secure networks.
Jamf is a mobile device management (MDM) solution with tools to make Apple devices perform in a corporate environment. SecureW2’s Managed Gateway API helps you distribute digital certificates to every Apple device on the Jamf platform. Read on if you would like to distribute certificates to your Apple devices via Jamf for passwordless authentication to secure your network.
Configuring SecureW2’s Managed Device Gateway API
To configure SecureW2’s Managed Device Gateway API, you need to start with configuring:
- The intermediate CA
- The certificate format
- The SCEP gateway URL
Here’s an overview of the steps you need to take:
- Configure the intermediate CA, the certificate format, and the SCEP URL in SecureW2’s PKI services management portal.
- Upload your new signing certificate to the Jamf management portal.
- Provide the SCEP URL through which certificates will be issued.
- Set up the Jamf SCEP and Wi-Fi profiles for both Mac and iOS devices.
You’ll also need to ensure that end-users can enroll their devices through Jamf and that you have already created the requisite certificate for Apple push notifications and uploaded it to Jamf.
Setting Up EAP-TLS SCEP Enrollment in SecureW2
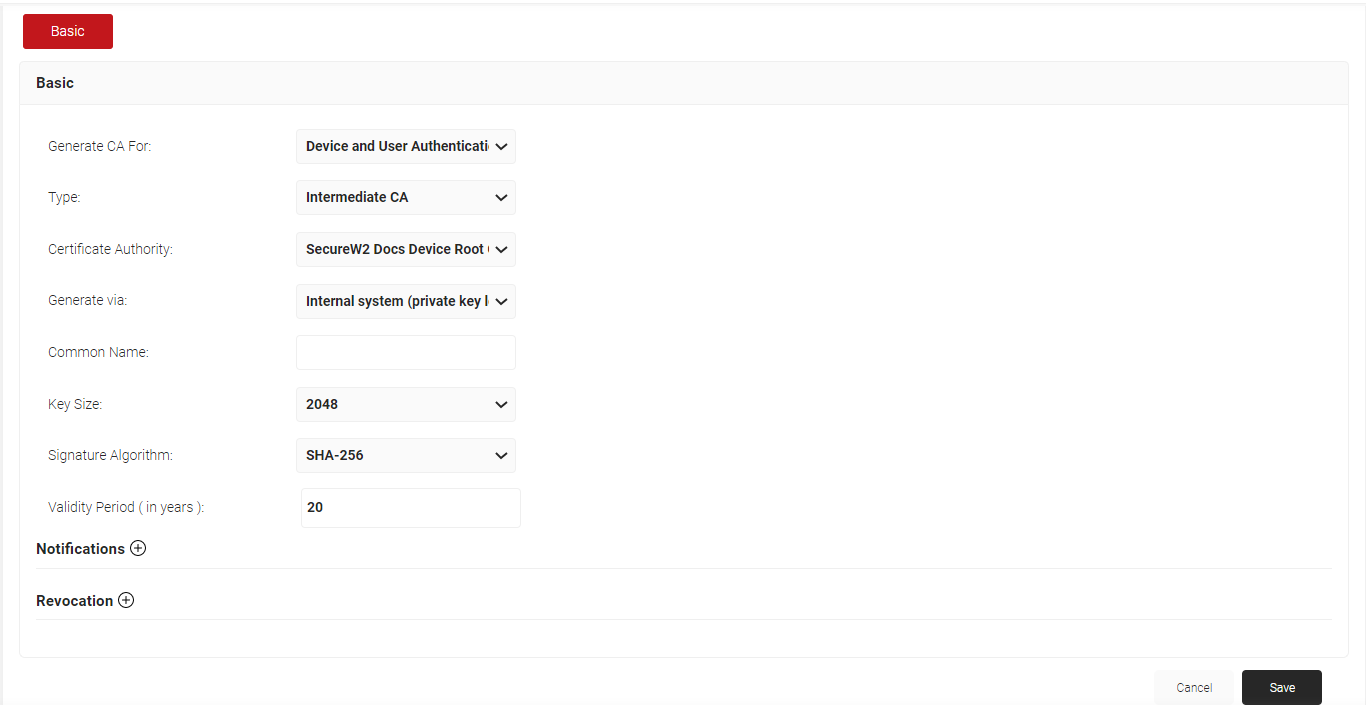
Begin by setting up the intermediate Certificate Authority (CA) you will use in the SecureW2 portal. Using intermediate CAs is a vital security practice; if anything happens to one CA, only one CA will be affected, protecting your root CA from compromise.
You can create as many intermediate CAs as needed in the SecureW2 management portal through the PKI and Certificate Authorities sections.
How to Create A Jamf Signing Certificate
A Jamf signing certificate guarantees the keys for safe authentication to your network. It contains the user’s unique identity and the public key. To create a certificate, you should:
- Click the PKI>Create Certificate from the SecureW2 Management Portal.
- Select the OS, and you will be prompted to enter a MAC address and description.

- The Intermediate CA is the next step as you select the CA.
- Check the Include Entire Certificate Chain option to establish the certificate’s full trust chain.
- Enter the pertaining values in the SAN section and Client Authentication in the Use Certificate For list.
- On clicking Create, you can download the PKCS12 file.
- The PKCS12 file is password protected and will prompt for one before opening and saving the certificate.
How to Set Up Jamf Configuration Profiles for SCEP and WPA2-Enterprise
Jamf Configuration Profile Setup for iOS
Once you have created a CA, you can configure your device infrastructure to support SCEP and assign them to users and devices on your network.
A trusted Root CA ensures your devices can use the SCEP profile to generate and distribute certificates. A Trust Chain is established with the same group that receives the
SCEP profile.
To configure SCEP for a Jamf profile set up for iOS:
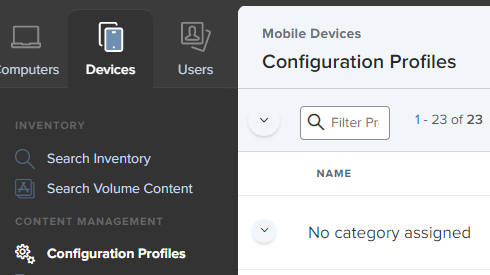
1. Go to Devices > Configuration Profiles on your Jamf PRO console. Select Options > General.
2. Enter your name and a device description.
3. Click the DISTRIBUTION METHOD drop-down and select Install Automatically or Available in Self-Service. Select the SCEP option.
4. Now click on Configure.
Enter the number of days before certificate expiration that the system should begin to display the expiration notice. In Profile, in the Scope section, update the scope for the devices to which the configuration profile will be pushed.
Setting Up a Jamf Configuration Profile for macOS
- From your Jamf PRO console, go to Computers > Configuration Profiles. Click New and select the option General.
- Enter a Name and Description. Click the DISTRIBUTION METHOD drop-down list and select Install Automatically or Available in Self-Service.
- Click on Configure.
- Select the Use the External Certificate Authority setting to enable Jamf Pro as the SCEP proxy for this configuration profile checkbox.
- For NAME, enter the common name of the intermediate CA that will be issuing the certificate for the client. You can find the common name in your SecureW2 Management Portal. For SUBJECT and SUBJECT ALTERNATIVE NAME, enter a value to help the admin identify the device.
- You can make this a static value. Click Save and then click Done.
- Enter the number of days before certificate expiration that the system should begin to display the expiration notice.
- In Profile, in the Scope section, update the scope for the devices to which the configuration profile will be pushed.
Certificate Payload for RADIUS Server Certificate Validation Setup
During 802.1X authentication, a RADIUS server presents its certificate to the supplicant, i.e., the device. The server certificate should originate from a trusted source. Additionally, if the certificate comes from a known CA, it must be trusted for the original purpose it was created for.
In this case, the server’s certificate must be trusted for the RADIUS service. When joining an enterprise network, this is done manually as the user is prompted to trust the certificate for the connected Wi-Fi network or in a configuration profile.
- To set up the certificate payload in Jamf Pro Console, go to Devices > Configuration Profiles.
- Click Edit for the configuration profile you want to configure.
- Select Options > Certificate. Click Configure.
- For CERTIFICATE NAME, enter the name of the certificate you’re adding. This will be the Common Name (Issued To name).
- For SELECT CERTIFICATE OPTION, click the drop-down list and select Upload. Click Upload Certificate.
- In the Certificate pop-up, click Choose File and select the CA certificate you want to upload.
How to Configure Wi-Fi Payload for 802.1X
- From your Jamf PRO console, go to Devices > Configuration Profiles.
- Click Edit for the configuration profile you want to configure. Select Options > Wi-Fi
- Click on Configure. For SERVICE SET IDENTIFIER (SSID), enter a name. Select any other relevant settings like Hidden Network, Auto Join, and/or Disable Captive Network Detection.
- For SECURITY TYPE, click the drop-down list and select WPA2-Enterprise. Select Protocols, and check the box for TLS for Accepted EAP Types.
- Select Trust, and for Trusted Certificates, check the box for the certificate you uploaded. For CERTIFICATE COMMON NAME, click Add.
- In the field that appears, enter the name of the RADIUS server used for validation, and then click Save. Click the Protocols tab.
- From the Identity Certificate drop-down list, select the CA from the SCEP payload. At the bottom right, click Save to save the Wi-Fi payload.
- When a device successfully enrolls, the Configuration Profiles table shows an increased value for Completed.
Jamf integration With SecureW2
SecureW2 integrates with any major device network infrastructure from all the leading vendors. We combine with Jamf to offer a turnkey PKI solution that provides:
- Robust certificate provisioning
- Automated certificate revocation
- Better network security
Robust Certificate Provisioning
The SecureW2 Managed PKI allows users to configure devices for certificate-based authentication in minutes. While the manual process requires high-level IT knowledge to follow and hours of maintenance, our PKI involves only a few clicks and ends with a certificate ready for authentication.
JoinNow is so advanced it can even enroll YubiKeys for certificates and attest to the Private Key generation location, enabling high assurance access security policies.
Automated Certificate Revocation
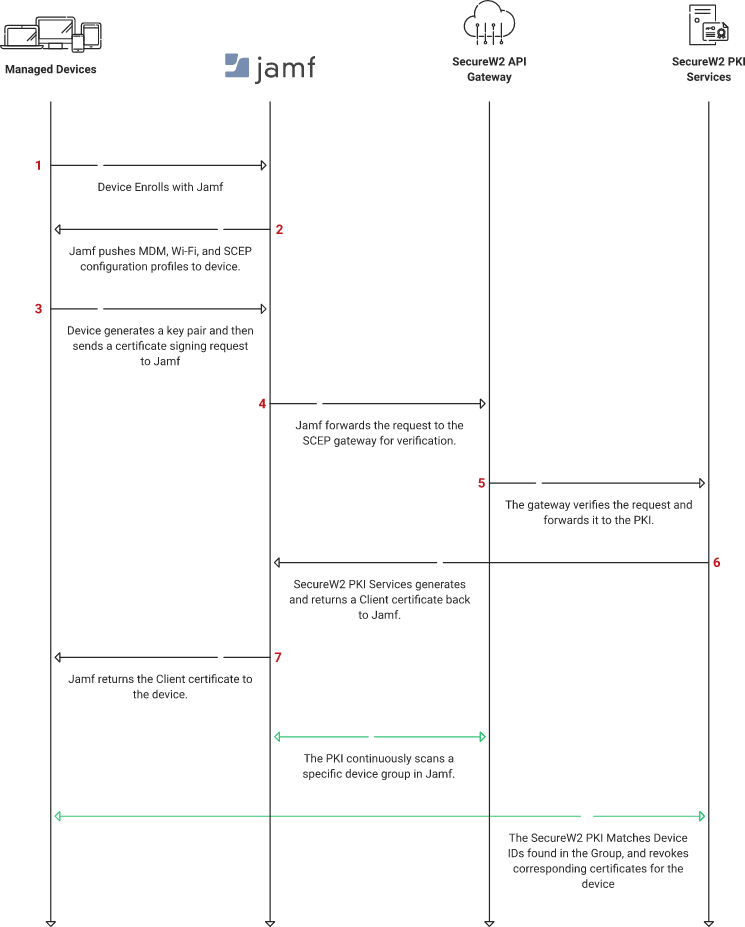
Provisioning certificates isn’t the only step in the certificate lifecycle that SecureW2 makes easy. It’s simple to revoke certificates, too — no more hours manually revoking dozens, hundreds, or even thousands of certificates.
JoinNow Connector PKI’s Jamf auto-revocation feature is the key. Administrators can configure the PKI to periodically check smart/static groups in Jamf every several minutes. Certificates found in those groups will automatically be revoked.
Stronger Network Security
SecureW2’s certificate solutions ensure that once a user is equipped with their certificate, it cannot be stolen or given away. Only approved network users can be identified in the IDP, and you can ensure no outside actor can gain a certificate. They can also be configured to authenticate and secure various processes like VPN and email security.
Secure Your Network With SecureW2
Network management is one of the most essential duties of an IT department, so equipping them with the best tools to complete that task is vital. By streamlining the configuration and authentication processes, IT won’t be distracted by support tickets or authentication problems.
Combining SecureW2 and Jamf results in a secure and efficient network that relies on modern authentication methods.
Check our pricing page to see if SecureW2’s certificate solutions can support your Jamf network.