How to Set Up Passwordless RADIUS Authentication with an Ubiquiti Unifi Access Point

Ubiquiti’s ubiquitous Unifi Access Point is an industry-standard that boasts great compatibility and customizability. It is most effective at protecting your network when configured to send and receive X.509 digital certificates for authentication, as recommended by CISA.

Luckily, there are easy RADIUS solutions that enable certificate authentication even on Ubiquiti products. Below is an integration guide for configuring Ubiquiti APs to support EAP-TLS, the authentication protocol that is used to implement certificates on WPA2-Enterprise for 802.1x network authentication.

Process Summary

  1. Create a RADIUS Profile using SecureW2’s Cloud RADIUS
    • By creating a new RADIUS Profile with SecureW2’s Cloud RADIUS, you can enable EAP-TLS authentication protocol on your existing Ubiquiti infrastructure.
  2. Create an Open SSID for onboarding
    • In order to automatically issue certificates to connected devices, we will set up an Open/Onboarding SSID that automatically redirects users to a BYOD self-enrollment portal. You can also have your managed devices automatically enroll themselves using our Managed Device Gateway APIs. 
  3. Create a Secure SSID
    • Create a new wireless network in the Unifi Network Console and set the security type to WPA2-Enterprise. Once the new RADIUS profile is attached to the network, you’re set up to enjoy increased security and enhanced user experience.
  1. From your Unifi Network console, go to Settings > Profiles.
  2. Click Create New Radius Profile.
  3. For Profile Name, enter the name of the profile.
  4. For VLAN Support, check the box for Enable RADIUS assigned VLAN for wireless network.
  5. In a new browser tab/window, log into your SecureW2 Management Portal.
  6. Go to AAA Management > AAA Configuration.
  7. Copy the information for Primary IP Address, Port, and Shared Secret (to your clipboard or somewhere handy), and
  8. Paste respectively into the Create New Radius Profile form for IP Address, Port, and Password/Shared Secret. Ubiquiti create radius profile
  9. Click Save.
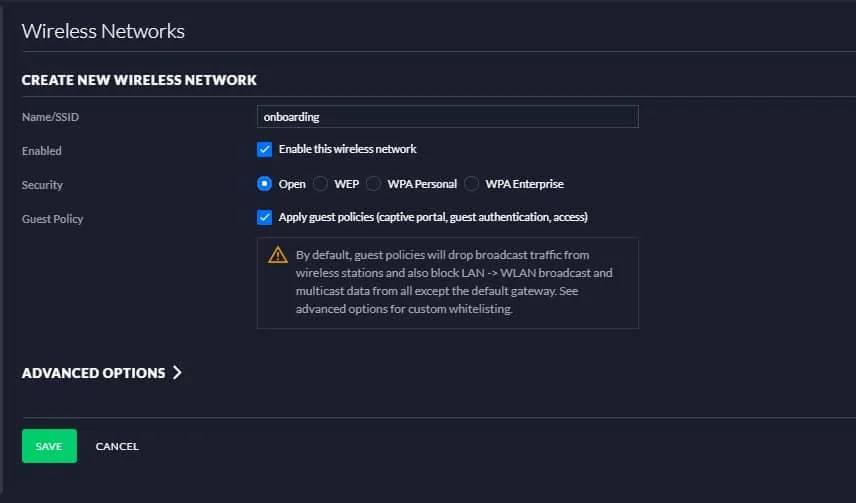
  1. Navigate to Settings > Wireless Networks > Create New Wireless Network.
  2. For Name/SSID, enter the name of the SSID.
  3. Under Enabled, check the box to Enable this wireless network.
  4. Under Security, select the radio button for Open.
  5. Under Guest Policy, select the box “Apply guest policies (captive portal, guest authentication, access)”
  6. Click Save.

ubiquiti eap tls
Since Ubiquiti doesn’t support sub-domains in the URL, we recommend that you set up a local webserver with a rewrite URL that directs the user to the SecureW2 landing page.

Sample rewrite rules using Ubuntu Apache:

sudo vi /etc/apache2/sites-available/000-default.conf

Add the following lines within VirtualHost section:

RewriteEngine on 
RewriteCond %{HTTP_HOST} ^companyname.com [NC]
RewriteRule^(.*)$https://cloud.securew2.com/public/82373/local

The above example shows the url as “companyname.com”, which is in the Ubiquiti controller. When a client tries to access this URL, it will encounter the rewrite rule and be redirected to https://cloud.securew2.com/public/82373/local

Add the webserver URL to “Redirect using hostname”:

  1. Navigate to Settings > Guest Control > Guest Policies
  2. Check the Box “Enable Guest Portal
  3. Under Authentication –> Choose No Authentication
  4. Check the Box “Redirect using hostname
  5. Click Save.

eap tls ubiquiti

Add the ACL’s: 

We need to limit this SSID, so it can only be used for self-service certificate enrollment and device network-access configuration. For more details regarding what should and shouldn’t be accessed on this SSID, you can get in touch with our expert support engineers.

  1. Navigate to Settings > Guest Control > Guest Policies
  2. Check the Box “Enable Guest Portal
  3. Under Access ControlPre-Authorization > add the ACLs (hostname or IPV4)
  4. Click on Apply.

unifi eap tls

  1. From your Unifi Network console, go to Settings > Wireless Networks.
  2. Click Create New Wireless Network.
  3. For Name/SSID, enter the name of the SSID.
  4. For Enabled, check the box for Enable this wireless network.
  5. For Security, select the radio button for WPA Enterprise.
  6. For RADIUS Profile, click the dropdown and select the RADIUS profile you created.
  7. Click Save.

Now when users enroll for a certificate using your secure SSID, they’re redirected to your SecureW2 landing page. They enter their credentials and a client is deployed on their device, which then installs the wi-fi certificate and appropriate network settings to authenticate via EAP-TLS. Their device is then migrated to your secure SSID.

SecureW2 offers a turnkey PKI solution that can integrate into your existing network, eliminating the need for network downtime and costly forklift upgrades. Our Cloud RADIUS is the industry’s only RADIUS solution that was built for certificate-based authentication and bridges on-prem and cloud environments.

Configuring an Ubiquiti Unifi AP for certificate-based authentication is a relatively painless adjustment that vastly enhances the security and user experience of your network. SecureW2 has affordable options for organizations of all shapes and sizes. Click here to see pricing information. Click here to see pricing information.

CTA Background