In this guide we will integrate SecureW2’s PKI, RADIUS, and Device Onboarding and Certificate Enrollment software with Meraki Access Points to deliver EAP-TLS, certificate-based 802.1x authentication.
With SecureW2, you can easily configure any 802.1x Wi-Fi infrastructure for EAP-TLS. Transitioning from credential to certificate-based authentication has never been easier, with many of our customers getting it done in less than a couple hours. First we will highlight the high level configuration steps we will cover in this guide, and then cover each step in more detail.
- Configuring SecureW2 PKI Services
- Configuring and managing a PKI is difficult. This is why we designed our PKI Services to be completely turnkey. Everything that’s required for EAP-TLS (Certificate Authorities, CRL, Management Software.. etc) is created using our simple Getting Started Wizard.
- Identity Provider Integration
- SecureW2 Integrates with every major LDAP and SAML IDP to authenticate users and enroll them for certificates. Below are some of our integration guides on how SecureW2 integrates with Identity Providers:
- Active Directory / LDAP
- Google Apps
- Active Directory Federation Services
- Okta
- SecureW2 Integrates with every major LDAP and SAML IDP to authenticate users and enroll them for certificates. Below are some of our integration guides on how SecureW2 integrates with Identity Providers:
- Getting Users Enrolled for Certificates
- Set up Onboarding SSID for BYOD Self-Service Certificate Enrollment
- Users can easily enroll themselves for 802.1x and certificates and get their devices configured for secure network access using the JoinNow Suite; our Best-in-Class Onboarding Software. They can use it to set up their devices from the comfort of their own home, or you can configure an Open SSID to redirect users to the JoinNow Onboarding Solution to ensure the enrollment process goes off without a hitch.
- Using Gateway APIs to Auto-Enroll Managed Devices for Certificates
- Rather than manually enrolling every managed device for a certificate, use our Managed Device Gateway APIs to automatically enroll all your managed devices, through any major MDM software, for machine and/or user certificates.
- Set up Onboarding SSID for BYOD Self-Service Certificate Enrollment
- Configuring the RADIUS Server
- Integrating SecureW2 PKI Services with a RADIUS Server
- Our PKI services integrate cleanly with all major RADIUS servers. We can work with your existing infrastructure to make implementation totally painless. No RADIUS infrastructure? No problem, SecureW2 comes built in with our Cloud RADIUS. Click here to read more about our RADIUS Solutions.
- Integrating a Meraki AP with a RADIUS Server
- Once you’ve figured out your RADIUS set up, the SecureW2 JoinNow Suite can configure your RADIUS server to integrate seamlessly with Meraki AP. Below is a step-by-step guide.
- Integrating SecureW2 PKI Services with a RADIUS Server
Configuring an Open SSID for Self-Service Certificate Enrollment
Setting up EAP-TLS authentication on your 802.1x network is easier if you create an Onboarding SSID, especially for new devices that have previously never connected to a network. When users enroll for a certificate on the Onboarding SSID, they are redirected to the SecureW2 landing page.
In lieu of using an Onboarding SSID, users can use mobile data to enroll for a certificate when using applicable devices. From here, the OS is detected and a client is deployed that is specific to the OS. The client then configures the device by installing the Wi-Fi certificate and appropriate network settings required to authenticate via EAP-TLS. Lastly, their device is migrated to the Secure SSID.
In the past, the process of loading certificates into users’ devices was incredibly difficult, but the SecureW2 onboarding process requires just a few steps. It takes the burden off the IT department to onboard every network user, but still allows them to monitor the Wi-Fi onboarding process.
Once certificate authentication is complete, users can automatically connect to the network without the hassle of password-related disconnects caused by password change policies.
Configuring your SSIDs
- Login to the Meraki Dashboard
- After selecting your Organization and your Network, select Wireless to configure your SSIDs
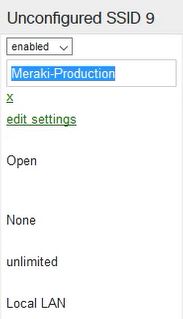
- To create a new SSID, select an unconfigured SSID and switch it from disabled to enabled
- Rename the SSID to configure it, and click Save Changes
Configure Access Point to use Splash Page
- Select Wireless again, and choose Access Control
- Set the Network Access to Open (no encryption)
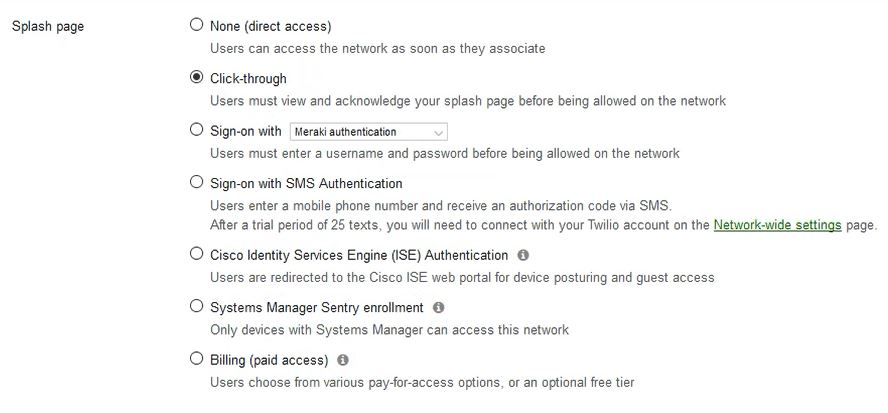
- Under the Splash Page section, select Click-through
This process will set the redirect to go to the SecureW2 landing page.
Configure a Walled Garden
When implementing a BYOD system, it’s vital to keep corporate data and personal data separate and protected. A proven method has been utilization of a walled garden. Instituting a walled garden keeps corporate data stored in a secure application that is separated from personal data. This creates insurance for the corporation that their sensitive data will not be breached.
For an Onboarding SSID, you need to allow onboarding related resources. For example, the MultiOS solution uses an Android application to configure Android devices for WPA2-Enterprise, so we need to allow access to the Play Store on our Onboarding SSID.
Another example is the Apple CNA can get in the way of WPA2-Enterprise configuration. The CNA is prompted when an Apple device can’t contact certain Apple servers, so we need to allow contact in order to prevent the CNA from popping up.
We control what resources can be accessed on the Onboarding SSID by using a Walled Garden. It allows network administrators to control access to certain sites and applications, steering network users away from potentially harmful situations.
To configure the Walled Garden:
- Select Wireless again
- Go to the Firewall & traffic shaping settings, and make sure your SSID is selected
- Under the Layer 3 firewall rules section, you will need to:
- Input the rules that allow the firewall through to SecureW2 resources (See Chapter 2: Firewall Rules in the JoinNow MultiOS Deployment Guide in the management portal)
- The last policy you need to add is to deny 0.0.0 to clarify to the firewall that someone can’t be abusing this open SSID just to access the internet
- Save Changes
Setting up the redirect to the SecureW2 landing page
The last thing you’ll need to configure is the redirect. Under Wireless:
- Click on Splash Page
- Double check that the SSID is the same as the one you configured earlier
- In the Custom Splash URL section, input the Onboarding Landing Page URL from SecureW2, and click Save Changes
Now you have your Onboarding SSID all configured! In the next section, we’ll look at how to integrate SecureW2 RADIUS with Meraki APs.
Integrating the SecureW2 RADIUS with Meraki Access Points
Now that we’ve configured the onboarding SSID that will enroll users for a certificate, we need to setup the secure SSID. This SSID needs to be configured for EAP-TLS WPA2-Enterprise authentication. It also needs be integrated with a RADIUS server, which in this case will be the SecureW2 RADIUS server, that will authenticate the users’ certificate and authorize them for network access.
Configuring your SSIDs
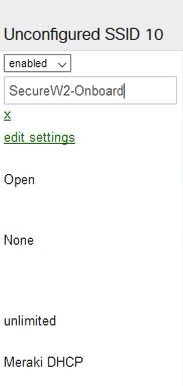
- Create another SSID by selecting an un-configured SSID and then enabling it
- Rename the SSID (make sure it is the same name as the SSID in the Network Profile)
- In your Network Profile, when you click Edit, you should see the SSID section, and the name you entered should match
- Scroll down and click Save Changes
Setting up the RADIUS Information
Now, you need to enter in the RADIUS information:
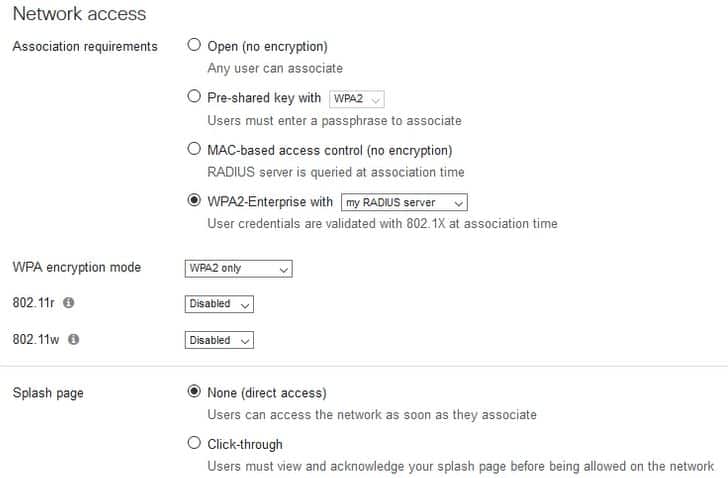
- Under Wireless, select Access control
- Under Network access change it from the default value of Open (no encryption) to WPA2 Enterprise with “my RADIUS server”
- For the WPA encryption mode, select WPA2 only
- In the Splash page section, leave it set to None (direct access)
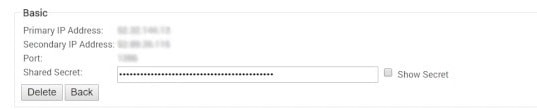
You can find the details about Your RADIUS when you go to AAA Management and AAA Configuration. Here you will see a Primary IP Address, Secondary IP Address, Port Number and a Shared Secret.
- Under RADIUS Servers, click the green link to Add a server
- Enter in the Primary IP Address, Port Number, Shared Secret respectively
- You will need to perform the same steps for the Secondary IP Address by entering the Secondary IP Address, Port Number, Shared Secret
- Scroll down and click Save changes

And that’s it, you’re on your way to a more secure wireless network! If you’re ready to get started, SecureW2 has affordable solutions for organizations of all shapes and sizes. Click here to learn more about our pricing.