
How to Set up a Cloud RADIUS Server in One Click
The RADIUS server has shaped how we look at Wi-Fi security today by performing the core tasks of Authentication, Accounting, and Authorization (AAA) within an 802.1x infrastructure. An efficient RADIUS or AAA server not only shields your network from unwanted access but also grants users varying levels of authorization and maintains activity logs.
However, that doesn’t mean that setting up a RADIUS server is always going to be sunshine and rainbows… unless you are talking about our own innovative Cloud RADIUS. Unlike the various on-premise RADIUS servers, you can easily configure our Cloud RADIUS in just a few clicks. In this article, we will explain how you can set up Cloud RADIUS by following these simple procedures.
RADIUS Integration Overview
❖ Create a SAML Identity Provider in SecureW2
The Identity Provider provides context that tells the Cloud Connector system how to connect to the user database and verify them before issuing certificates.
❖ Configure a SAML IDP
After users enter their user/device credentials during the certificate enrollment procedure, the IDP verifies the user/device and sends their attributes to SecureW2 via the SAML application. The user/device can receive a unique customized certificate that is linked to their identity once the attributes have been transmitted to SecureW2.
❖ Configure Attribute Mapping
As a network administrator, you can customize the attribute mapping in order to categorize network users into similar groups. You can also establish particular attributes to divide the network into groups according to each group’s identity within the organization.
❖ Configure Network Policies in SecureW2
As an admin, you can start customizing policies that control the network user experience once users are grouped into user groups. You can also apply unique security policies to separate users via Assigned Groups.
- For example, an organization can put users into separate groups based on information like department (marketing vs. sales) or educational status (student vs. staff). This ensures that a sales team member won’t have access to non-related groups and that a student wouldn’t have the same access as a faculty member.
❖ Configure RADIUS Lookup via OAuth
To use Cloud RADIUS to execute a real-time lookup with IDPs, you can create an OAuth application. This will enable you to run an additional security check and immediately revoke certificates and network access in real-time.
How to Configure the Cloud RADIUS Server
During the RADIUS authentication process, Identity Lookup verifies that a user is active within the organization by comparing the identifying information to the records of current users in the Identity Provider.
To connect our identity provider to lookup users, groups, and their devices, we will now establish an identity lookup provider in SecureW2.
Create an Identity Lookup Provider
- Navigate to Identity Providers in the Identity Management.

- Click Add Identity Provider.
- Enter the Name and Description in the respective fields.
- Select Type as Identity Lookup Provider and click Save.
- The page refreshes, and the Configuration, Attribute Mapping, and Groups tabs appear.
- Under the Configuration tab, provide the following information:
- In Client ID, enter the client ID that you retrieved from Google/Azure/Okta Workspace.
- In Client Secret, enter the client secret you generated in Google/Azure/Okta Workspace and save it in a secure place.
- NOTE: This secret will not be retrievable after updating the Identity Provider. Therefore, make sure this is saved in a secure place.
- Click Update.
- Click Authorize on your new Identity Lookup. This will test the connection between SecureW2 and Google/Azure/Okta Workspace.

Adding Attributes
To add a custom attribute to the IDP, perform the following steps:
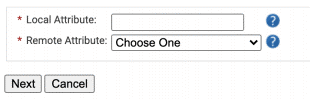
- In the Attribute Mapping tab, click Add. The next screen appears.
- In Local Attribute, enter a name for the attribute. This will be how your attribute will be referred to the Management Portal. Enter a description of the attribute.
- In the Remote Attribute field, select USER_DEFINED. Enter the value you want SecureW2 to receive from Google.
- NOTE: UPN is a mandatory attribute, so make sure you at least have one attribute that contains UPN in the Remote Attribute field.
- Click Next to create the custom attribute with the appropriate mapping.
- Repeat the steps if you want to create more attributes.
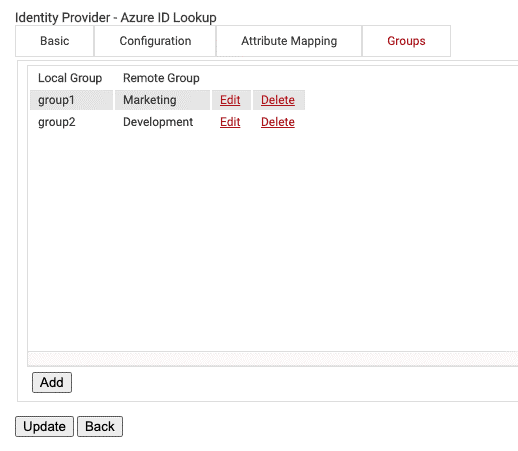
Configuring Groups
Lastly, Cloud RADIUS can perform a User Group Lookup so we can create network access policies based on the Groups a user is in.
- Under the Groups tab, click Add.
- Create any name for the Local Group. This name will be what shows up later as your Group in the SecureW2 Management Portal when you configure policies.
- In Remote Group, enter the name of your Group as it is configured in Google Workspace.
- Click Create.
- Click Update.
- Repeat as necessary for any Group you wish to create Network Policies around.

Configuring Policies
The purpose of a Network Policy is to specify how Cloud RADIUS will authorize access to a particular User Role. A typical Network Policy would say something like: “If User Role = Staff, authorize access and assign them to VLAN 2”.
You can configure any RADIUS Attribute to be sent to the wireless controller. If you leave the attribute section blank, it will just send Access-Accept. To create and configure the Network Policy, follow the steps below:
- Navigate to Policy Management > Network.
- Click Add Network Policy.
- Enter a Name and click Save.
- Under the Conditions tab, select the User Role you want to assign to this Network Policy.
- You can select multiple User Roles to assign a Network Policy.
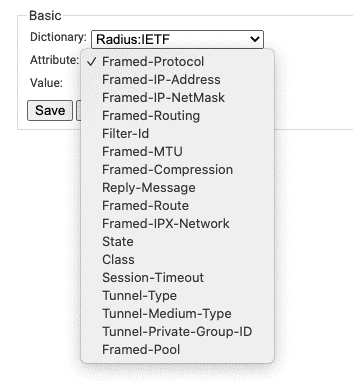
- Under the Settings tab, click Add Attribute.
- Select the Attribute you wish to send to the wireless controller.
- In Value, enter the appropriate value for your attribute.
- Click Update.
- Repeat as necessary for all the attributes you want to send for your User Role.
Cloud vs. On-Prem RADIUS
NPS is a physical on-site RADIUS server that is the foundation of most Microsoft environments. Because of its physical presence, you would think that having complete control over it is advantageous in one way or another, but that’s not always the case.
Cloud integration of NPS, designed primarily for on-premise AD setups, has significant downsides even with other Microsoft-owned cloud-based solutions like Azure AD. If you want to use Azure with NPS, you will require a separate authentication server or proxy to simplify the process. These operations are not only challenging and time-consuming but also relatively expensive.
The NPS server’s on-premise location also exposes it to a variety of physical security risks simply due to its physical accessibility. There are very few situations where on-prem RADIUS is less expensive than cloud RADIUS, given the price of maintaining highly-secure physical sites and additional personnel. Contrary to popular belief, cloud networks are typically much better protected and highly resilient compared to their on-premises counterparts.
Instant Setup of Cloud RADIUS
As you have seen, setting up Cloud RADIUS is easy compared to its counterparts, especially when you are using our unique management portal that not only simplifies the entire configuration process but also provides many innovative customization features to suit your specific needs.

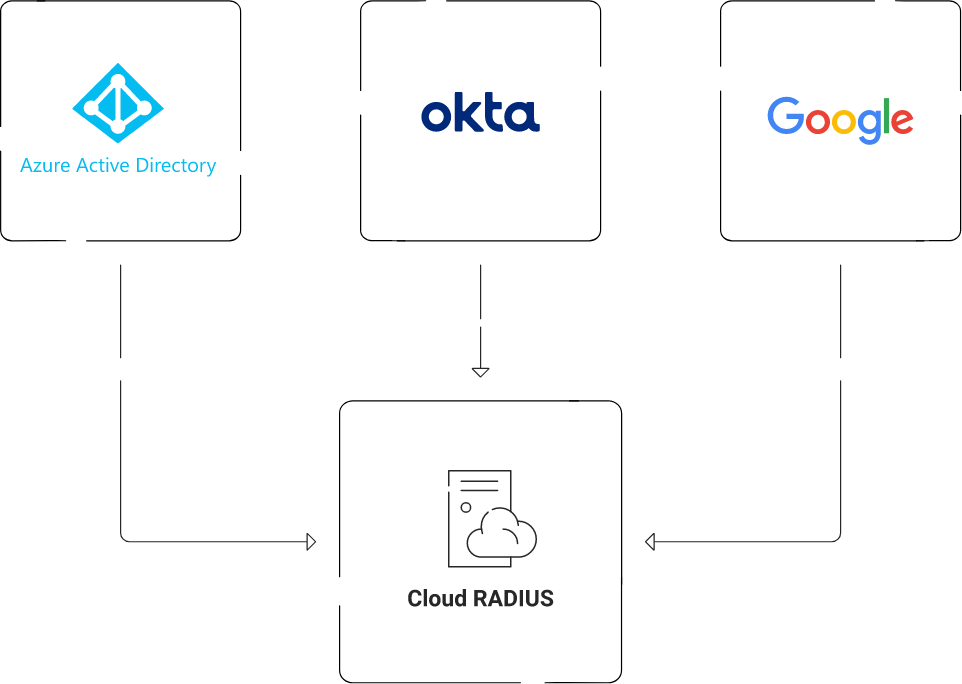
SecureW2’s CloudRADIUS is a superior and vendor-neutral solution that facilitates the transition to an all-cloud network and improves security across your organization. It minimizes the errors encountered with on-premises RADIUS and offers many security advantages that physical servers cannot provide. It also has built-in redundancy to provide easier integration into cloud applications such as Azure/Okta/Google that can securely authenticate remote users.
We also have an experienced support team that is always available to assist you in configuring a RADIUS server in a matter of minutes, and believe us, they have excellent expertise in what they do. You can book a call with us or check out our pricing page to see if SecureW2’s Cloud RADIUS solutions fit the authentication needs of your organization.
