
Google Workspace Onboarding for MDM and BYOD
Did you know a whopping 3 billion people use Google Workspace as of August 2023?
Many enterprise employees already use Google apps like Gmail and Google Drive daily across the globe. Gmail is almost synonymous with emails, making it the most preferred application due to its top-notch security, like two-factor and multi-factor authentication, ease of use, and more. The Google Workspace is a suite of productivity tools and comes with an admin panel for managing users and services.
However, every organization should onboard users to a secure network to maintain network integrity. This article will take you through authentication methods for Google onboarding your managed and unmanaged devices, the role of SAML in Google Workspace authentication, and how SecureW2 works with Google Workspace to bring seamless authentication with digital certificates to your organization.
Benefits of Google Workspace
Google Workspace provides granular access to users for specific applications based on attributes like identity, location, designation, IP address, and so on. Context-Aware Access helps you set user and device policies to prevent unauthorized access to confidential information and data.
Google Workspace also employs policies like data loss prevention (DLP) that prevent employees from sharing sensitive data and attachments with people not authorized by the organization. However, many devices and users still rely on passwords to onboard their devices to the network.
Google Workspace Onboarding with Passwords
Onboarding devices for the Google domain using passwords is the most popular option, as they are easy to remember and hassle-free. However, passwords for Google Workspace are less secure because:
- Passwords are generally shared between multiple users, increasing the risk of a potential breach and unauthorized access.
- Passwords can be stolen through socially engineered attacks like phishing, brute force, and dictionary attacks. Admins and network executives are targeted due to their accessibility to vulnerable resources.
- Identical or similar passwords are used for more than one application, leaving all the applications on the network vulnerable to attacks.
- Man-in-the-middle (MITM) attacks are another typical attack where an impersonator can get in the middle of communication and alter the communication between the parties. The user and the server believe that they communicate with each other, but in reality, they share with the impersonator.
Organizations like Microsoft and Google have been continuously necessitating moving away from passwords to a more secure form of authentication like multi-factor authentication and digital 802.1X certificates. Digital certificate authentication ensures only trusted devices or users connect to a network.
A digital certificate is based on the asymmetric cryptography format, each with a private and a public key. A private key can be decrypted only by the public key partner, making it a unique identification for the user as it cannot be duplicated or stolen over-the-air by an impersonator.
However, distributing certificates to all the devices and users can take time, adding costs and requiring extra staffing. This has been the typical reason organizations shy away from a full-fledged PKI. A good onboarding solution like JoinNow Connector PKI makes certificate distribution seamless for end users.
Click to read how a customer shifted to our certificate-based authentication solution for Google.
What Is Google Workspace Single Sign-on (SSO)?
A Secure Single Sign On (SSO) is a solution that helps you log into many applications securely using a single set of credentials. Google services use Google’s sign-in by default to authenticate users to apps like Gmail and Google Calendar. As users try to sign in to Google services, they are redirected to a sign-in page that asks them for their credentials. Upon entering their credentials, the user account is looked up in the directory in their domain.
When the domain is matched, the service looks for a Workspace account and asks the user to enter a password. The user is directed to the specific resources if the password is correct.
Google provides an SSO feature where users can authenticate themselves via an external IDP. The SAML protocol enables this, which helps secure authentication and authorization between an IDP and an external service provider.
What Is Google Workspace SAML Authentication?
The Security Assertion Markup Language (SAML) is an XML standard that lets secure web domains exchange user authentication and authentication data. With the help of SAML, any online service provider establishes contact with an identity provider to authenticate users onto a network and let them access data.
Google Workspace offers SAML-based single sign-on for partner companies to authorize and authenticate users to access web-based applications like Gmail or Google Calendar. The Google partner acts as the identity provider (IDP) to control user names, passwords, and other credentials to identify, authorize, and authenticate users for web applications.

Overview of SAML flow
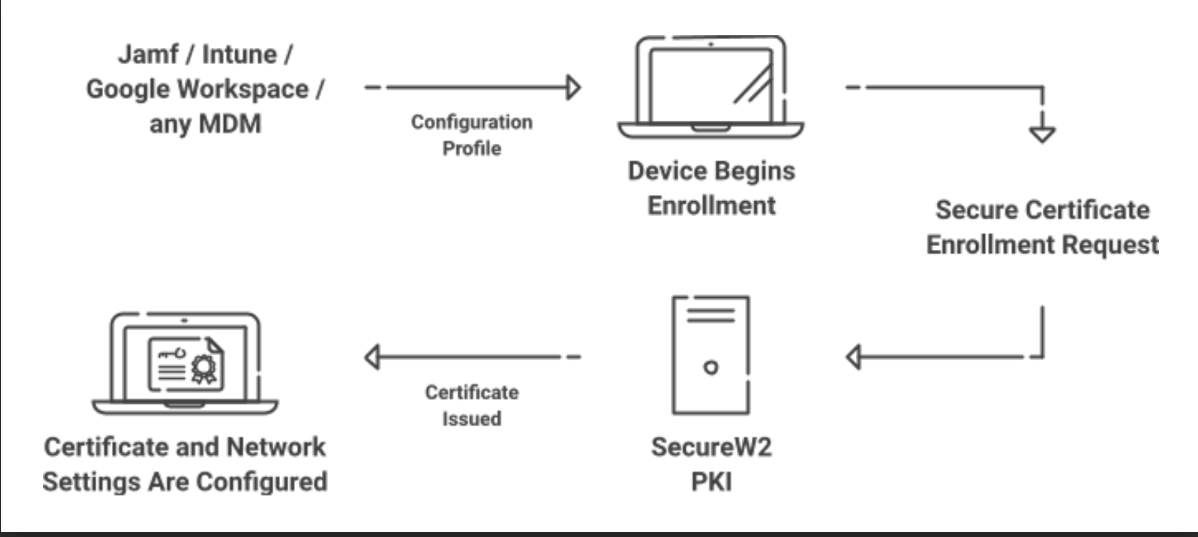
Onboarding Google Managed and BYOD to SecureW2
This article will take you through onboarding your managed BYODs with SecureW2. First, you’ll need to perform the following steps.
- Configure Google Workspace
- Configure SecureW2 with Google Workspace.
Let’s begin with configuring Google Workspace
- Open the Google developer console on your browser. https://console.developers.google.com/
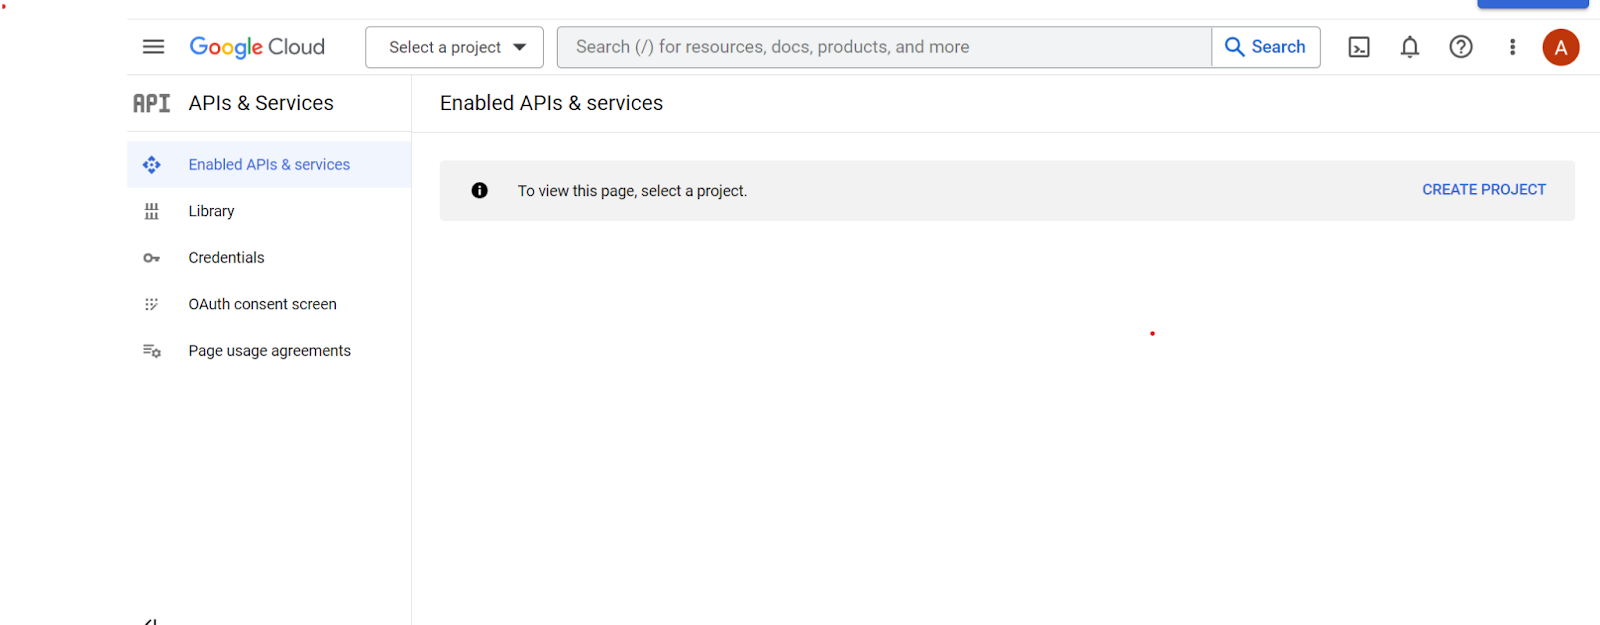
- Select an existing project or create a new project.
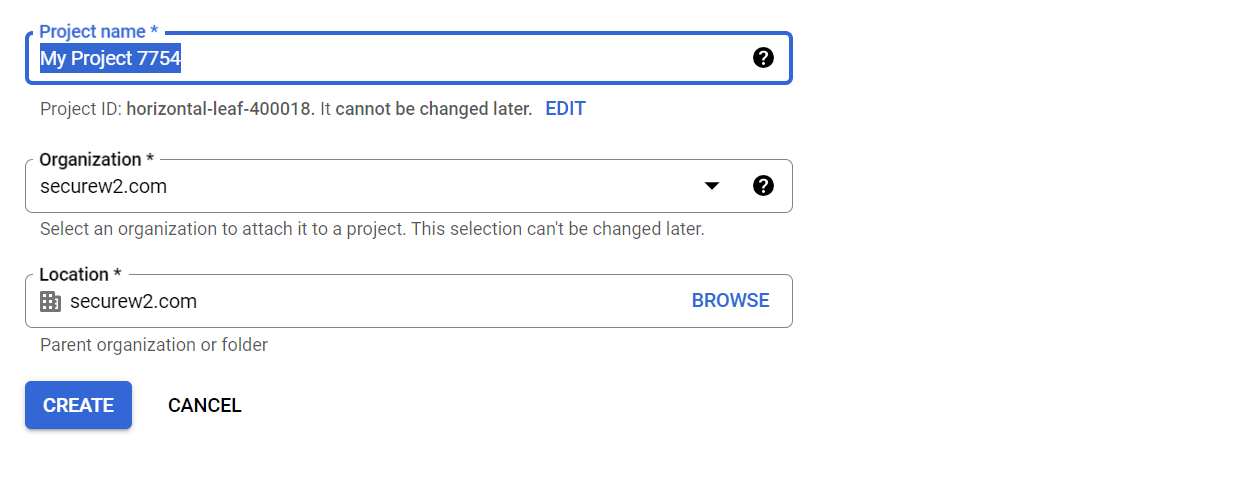
- Provide the Project name, Organization, and Location. Then, click Create.
- Create OAuth consent. To do so, click the OAuth consent screen in the left menu.
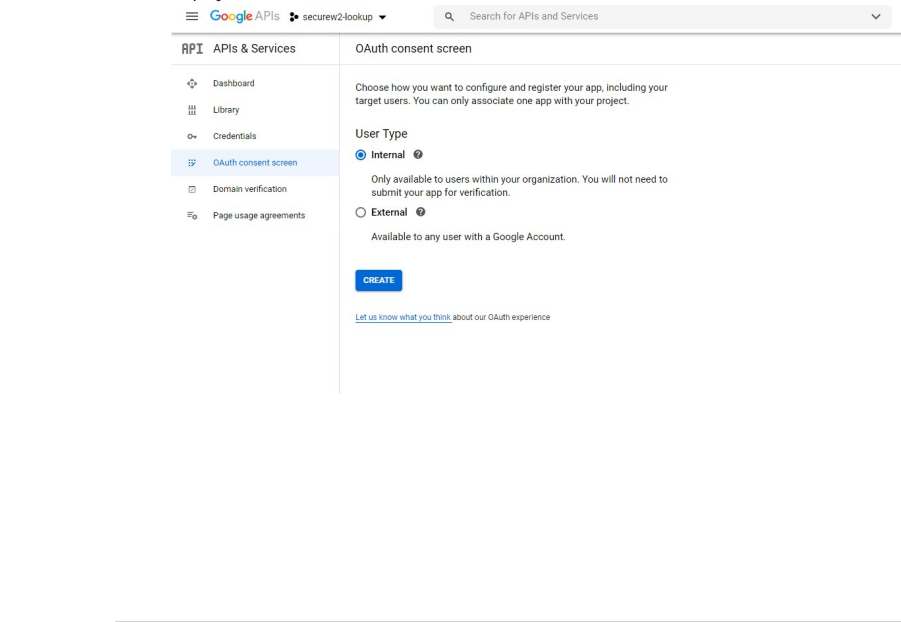
- Select the option “Internal” and click “Create.”
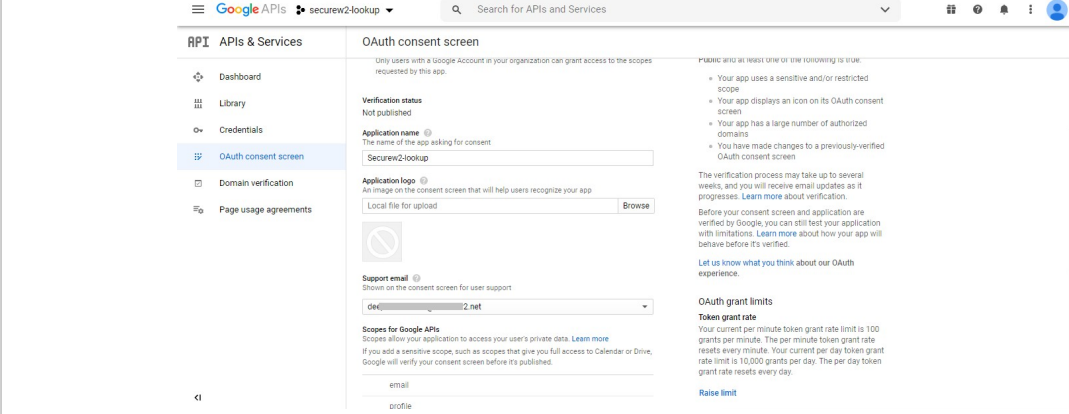
- Supply the Application name, logo, and Support email. Now, click on “Save.”
- Click on the “Credentials” bar in the left menu. You will see the following screen.
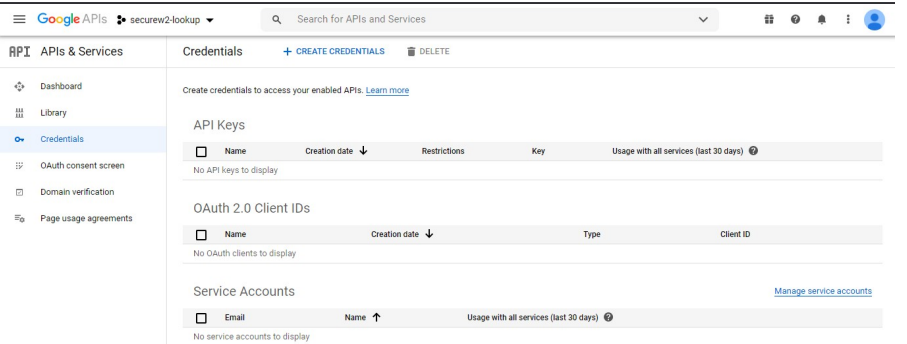
- Click on Create Credential> OAuth Client ID. You will see the screen below.
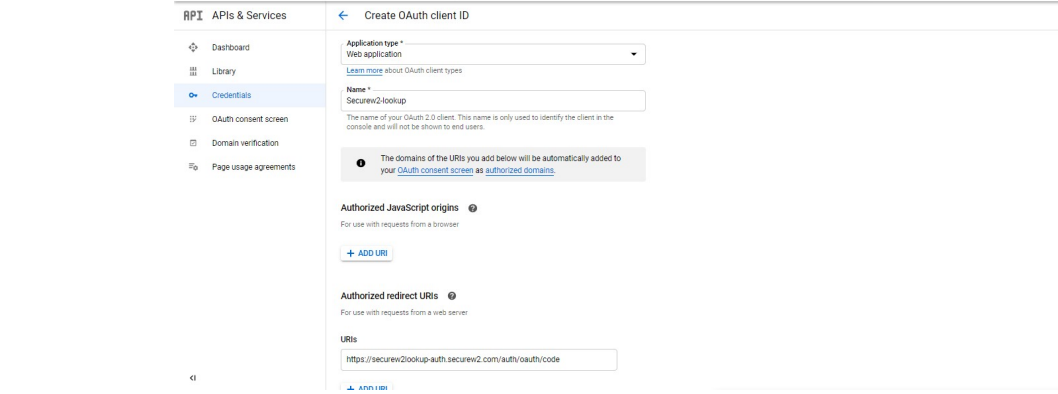
- From the Application type, select Web Application.
- Under the tab Authorized redirect URLs, add the authorization portal redirect URL. This URL can be obtained from the JoinNow Management Portal when configuring the GSuite Identity Lookup.
- Click Update to see the screen below.
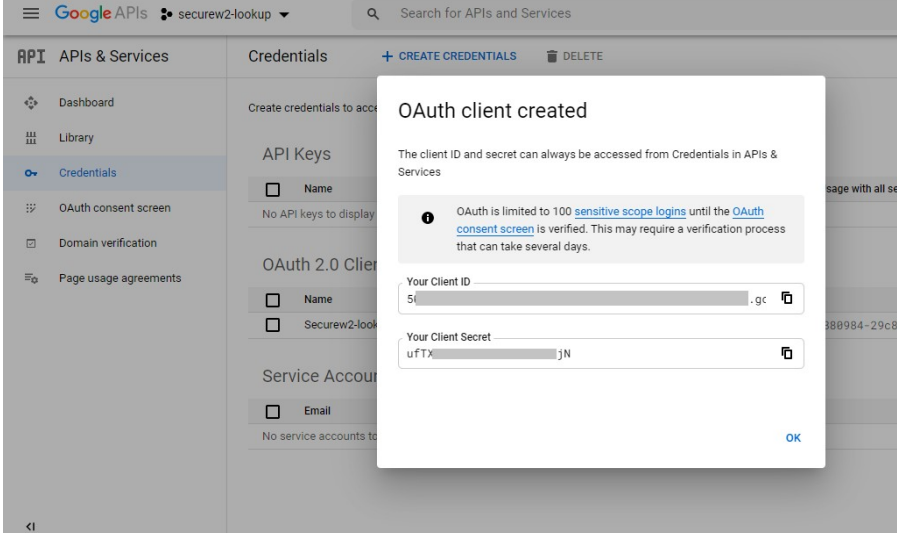
- Copy Your Client ID and Your Client Secret and paste them into the IDP configuration. Save them in a secure place. We will need to enter these into SecureW2 later.
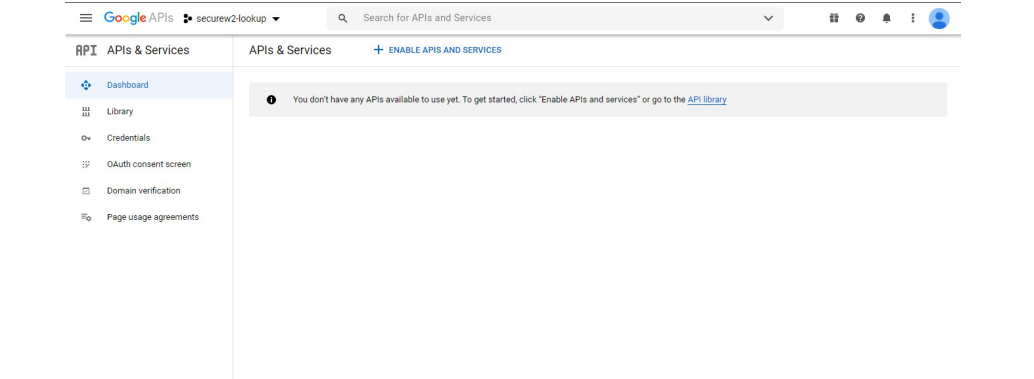
- Next, enable Admin SDK service from the Dashboard and click Enable API and Service.
- Search for Admin SDK.

- Open Admin SDK to see this screen.
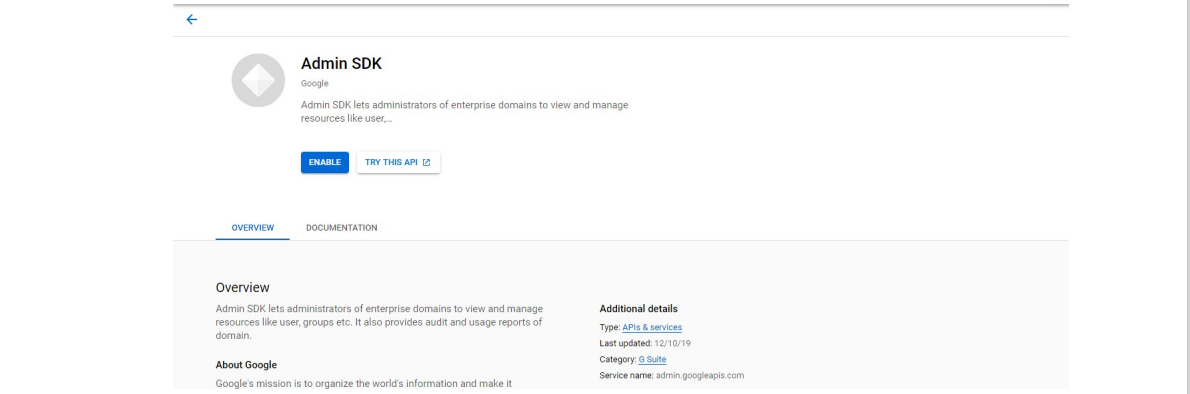
- Click Enable.
NOTE: The Authorize feature allows you to test whether Google service is set up correctly to work with SecureW2. You can use this feature after configuring an Identity Lookup Provider in the next part of the documentation.
Configuring SecureW2 for Google Workspace
To configure SecureW2 for Google Workspace, follow these steps:
- Run the Getting Started Wizard in SecureW2. This will create everything you need for 802.1X, including a RADIUS Server, Network Profiles, a Landing Page for Device Onboarding, and all the default network settings you will need for 802.1X.
- Navigate to Device Onboarding > Getting Started.
- From the Profile Type drop-down list, select the network profile type.
- In the SSID text box, type a name for the SSID.
- From the Security Type drop-down list, select WPA2-Enterprise.
- From the EAP Method drop-down list, select EAP-TLS.
- From the Policy drop-down list, select DEFAULT.
- From the Wireless Vendor drop-down list, select a wireless provider.
- From the RADIUS Vendor drop-down list, select a RADIUS vendor.
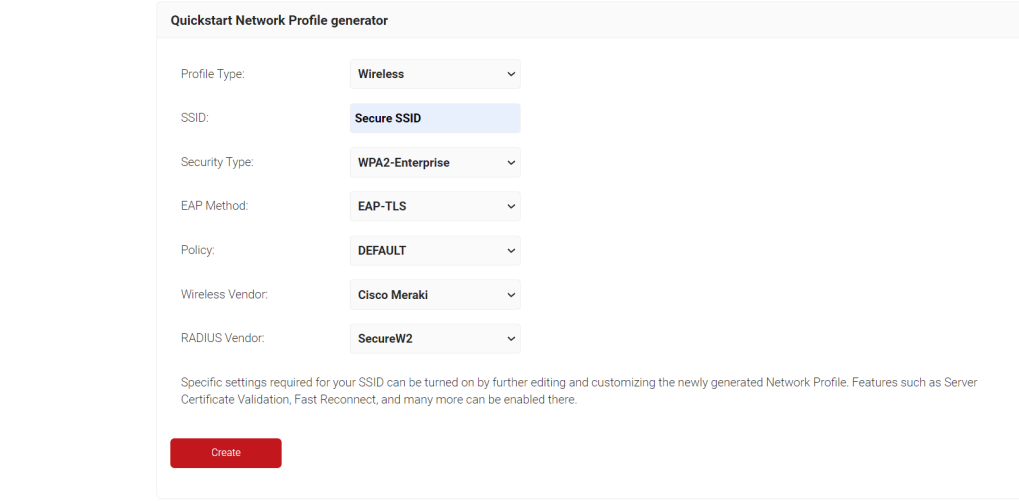
- When you click Create, your network profile will be generated.
Create an Identity Lookup Provider
The next step is to create an Identity Lookup Provider in SecureW2 to communicate with Google Workspace.
The identity lookup confirms whether a user is still active in the organization by identifying the user information against the existing user database. Let’s look at how to create an IDP in SecureW2’s management portal to look up users, devices, and policies.
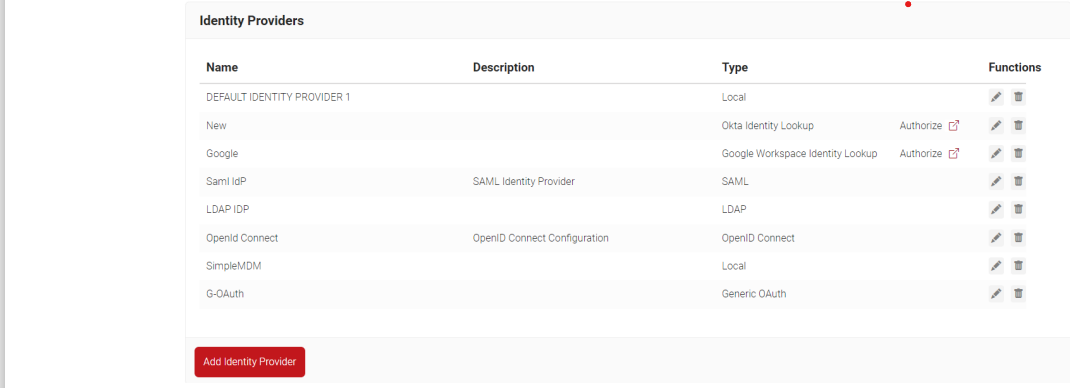
- Go to Identity Management>Identity Providers.
- Click on Add Identity Provider.
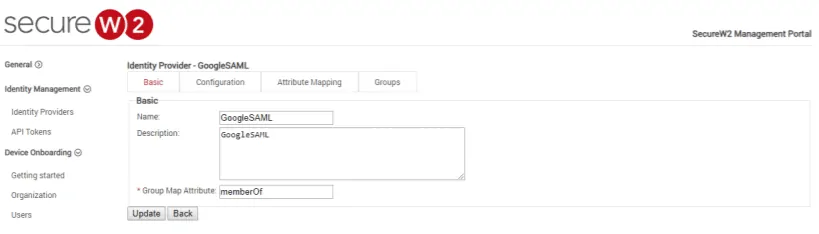
- You will be redirected to a screen. Now, enter the Name and Description of your IDP. Here, select Google Workspace Identity Lookup.

- Click on Save. This refreshes the page and goes to the Configuration, Attribute Mapping, and Groups Tab.
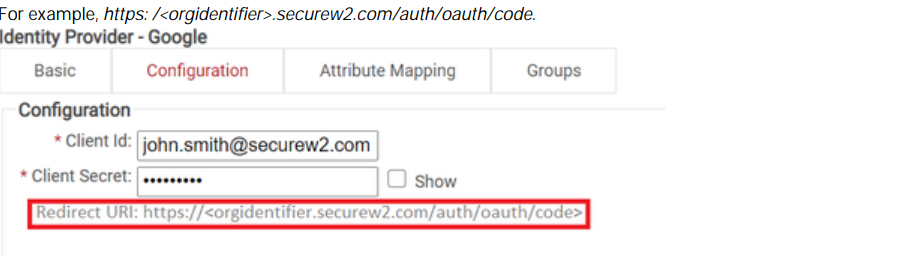
- In the Configuration Tab, use the following information
- Enter the Client ID under the Client ID tab you retrieved from Google Workspace.
- Enter the Client Secret generated in Google Workspace and stored securely.
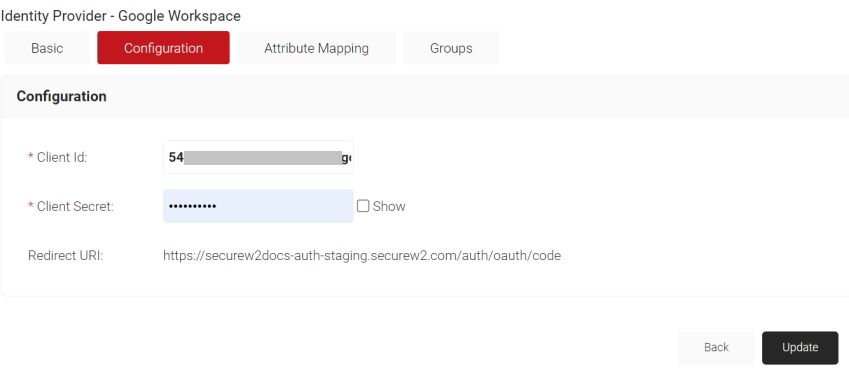
The secret won’t be retrievable once the IDP is updated. So, save it somewhere secure for later use.
- Click Update.
6. To test the connection between SecureW2 and Google Workspace, click Authorize on your new Google Workspace Identity Lookup.
SecureW2 Syncs With GSuite to provide Google Workspace SAML Authentication
As an admin, you can sync your G-Suite with the JoinNow Managed Devices API solution to communicate with G-Suite and provide a zero-trust process of issuing end users with digital certificates. Upon receipt, the client can present the certificate to the RADIUS for authorization and authentication to the network.
SAML General flow diagram with SecureW2

SecureW2’s Cloud RADIUS is a dynamic Cloud RADIUS with features like communicating with G-Suite during authentication to implement policy-level decisions and provide top-notch security with certificates. With digital certificates, you can also enforce user segmentation and group policies per the user’s status on G-Suite. Once enrolled, a user can keep the certificate for years, enhancing the user experience.
How to Configure a SAML Application in Google Workspace
An SAML application allows the user to enter the Google credentials in SecureW2’s management portal. The credentials are then passed to the IDP for further verification. The IDP verifies the user identity to send to the SAML application and hands it to SecureW2’s management portal to enroll for digital certificates.
To create a SAML application Google, follow these steps:
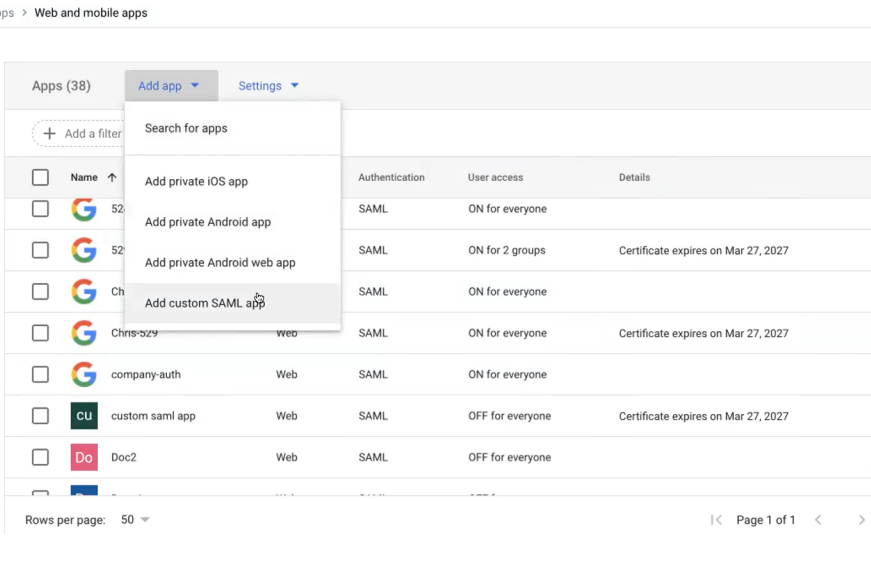
- Log in to your Google Admin Console
- Select Apps> Web and mobile apps
- Click Add App and select Add Custom SAML app
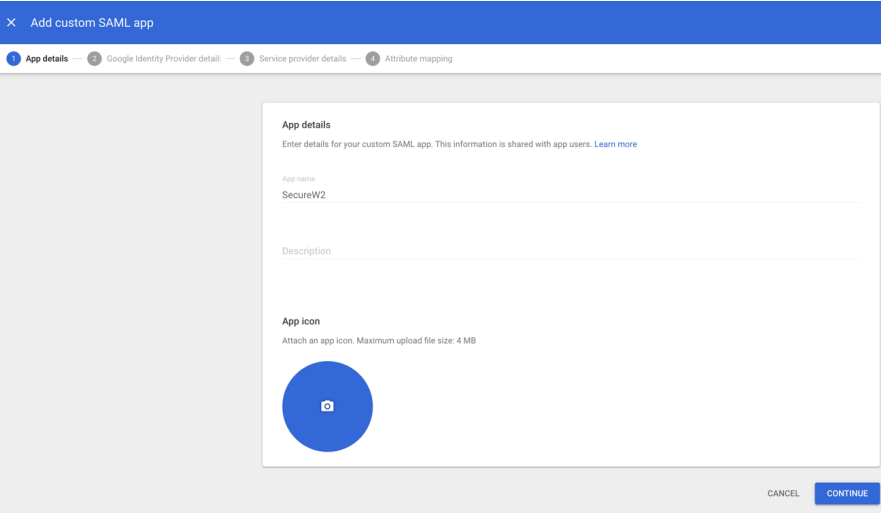
- In the App name field, type a unique name for the app and click Continue.
- Select the App name field, type a unique name for the app, and click CONTINUE. Under Option 1, click the DOWNLOAD METADATA button and save your computer’s metadata file (.XML). You need to import this metadata file to the JoinNow Management Portal.
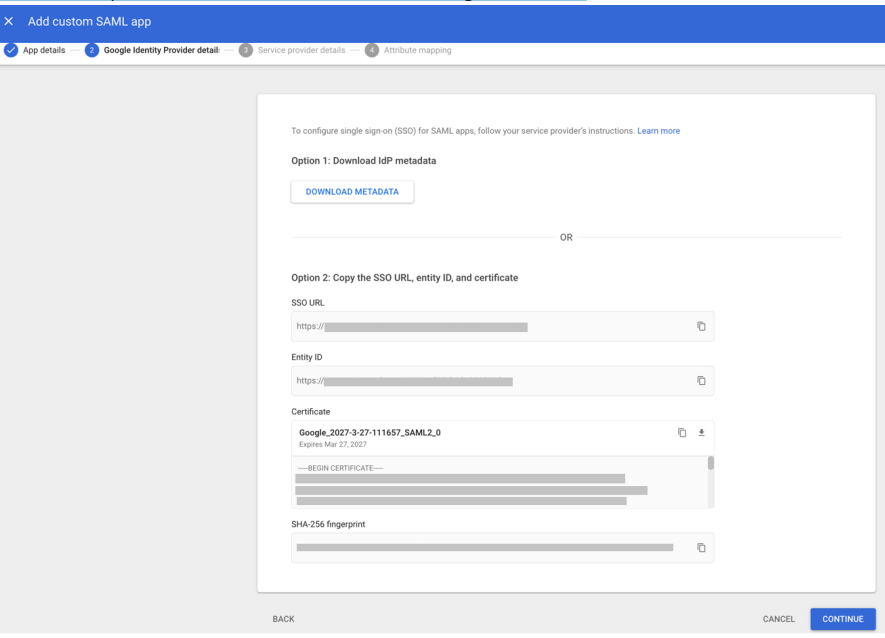
- Click Continue
- In the Management Portal, Click on Identity Management>Identity Providers
- Click the Edit link for the newly added SAML application on the Identity Providers page. The following screen is displayed.
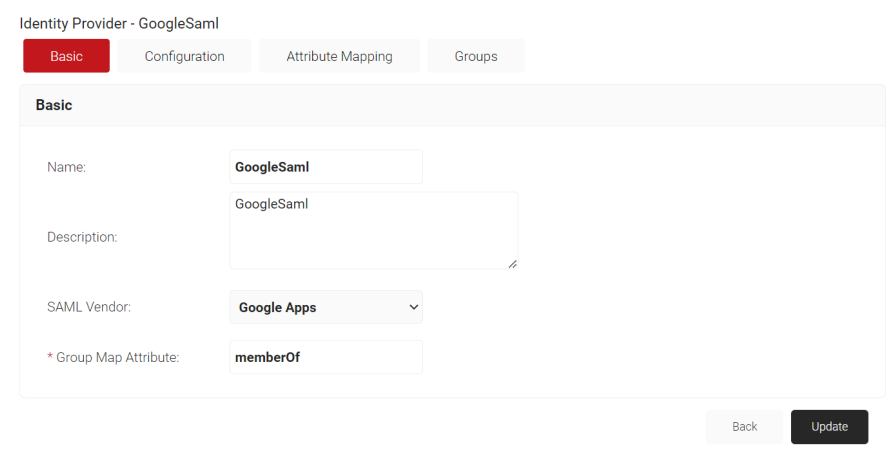
- Now click on the configuration tab.
- In the Service Provider (SP) Info section, copy the ACS URL and Entity ID values to your clipboard.
- Navigate to the IDP section and click on the Metadata field, then click Choose File. Select the metadata (.XML) file from the Google SAML application (downloaded earlier).
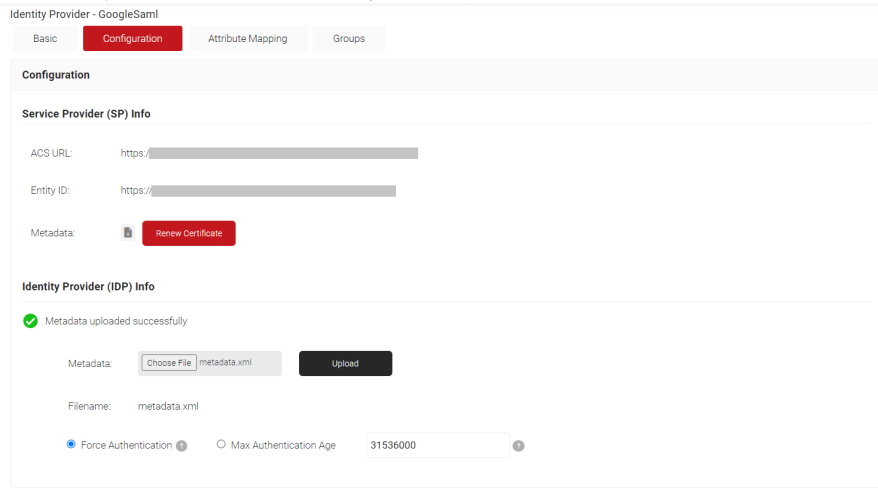
- Click Upload and then Update.
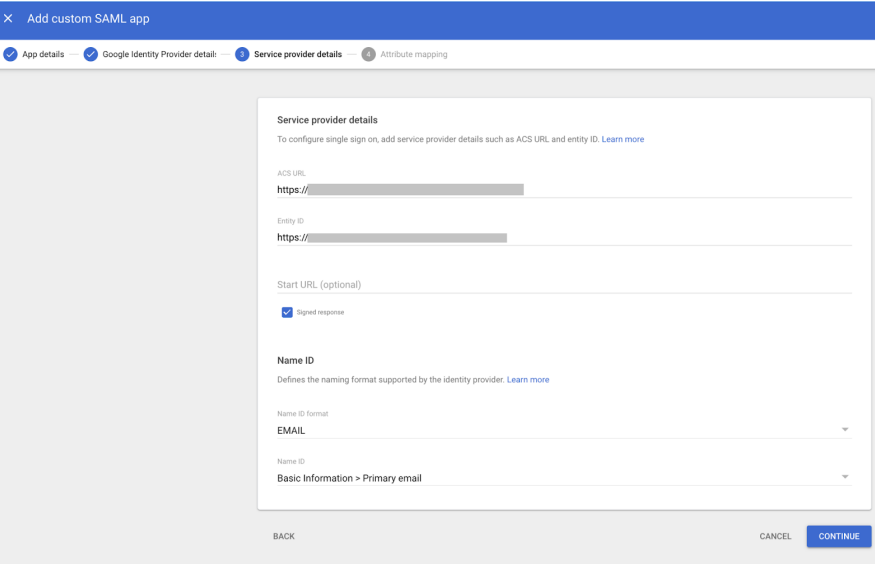
- Go to Google SAML Apps, and on the Service Provider Details screen, add the ACS URL and Entity ID (obtained in step 10).
- Check the Signed response checkbox.
- From the Name ID format drop-down list, select EMAIL.
- From the Name ID drop-down list, select Basic information > Primary email.
- Click Continue.
 18. Click Finish.
With the final click, you should now be able to configure the SAML application for Google Workspace and verify your user identity on your IDP.
Attribute Mapping Configuration
Once the IDP identifies the user, it sends the attributes to the SAML application, which then sends all the relevant attributes to SecureW2 and encodes these attributes into the digital certificate before issuance. To configure Attribute mapping, you need to:
- Scroll down to Attribute Mapping on the Google Admin page.
- Click on ADD NEW MAPPING to configure the attributes to be encoded into the certificate. (Your directory could have a name and email.)
- In the Enter the Application Attribute field, enter the name.
- From the Select Category drop-down list, select Basic Information.
- From the Select user field drop-down list, select First Name.
- Click Save.
- Click Add New Mapping again.
- In the Enter the Application Attribute field, enter your email.
- From the Select Category drop-down list, select Basic Information.
- From the Select user field drop-down list, select Primary Email.
- Click Save.

Now, Google will identify the end user and populate the credentials into the certificate variables before issuance.
- In your SecureW2 Management Portal, navigate to Identity Management > Identity Providers.
- Click on Edit against the SAML application that you created earlier. The following screen appears.
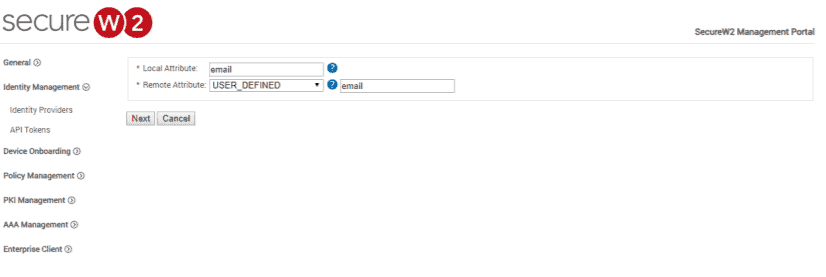
- Click on the Attribute Mapping tab. The following screen appears.
- Click Add.
- In the Local Attribute field, enter the email as the name of the variable.
- From the Remote Attribute drop-down list, select USER_DEFINED. Enter the email next to the Remote Attribute field when you choose USER_DEFINED.
- Click Next.
- Click Add.
- In the Local Attribute field, enter displayName as the variable’s name.
- From the Remote Attribute drop-down list, select USER_DEFINED. Enter the name in the field next to the Remote Attribute field when you choose USER_DEFINED.
- Click Next.
- Click Add.
- In the Local Attribute field, enter upon as the variable’s name.
- From the Remote Attribute drop-down list, select USER_DEFINED. Enter the email next to the Remote Attribute field when you choose USER_DEFINED.
- Click Update.
- The attributes are now configured, and you can view them under certificates.
Manage BYOD devices with SecureW2s PKI Solution
To manage BYODs and other unmanaged devices, SecureW2 offers JoinNow MultiOS, simplifying the onboarding of unmanaged and non-Chromebook users to your network. JoinNow MultiOS helps users securely onboard their unmanaged devices in a few minutes. We suggest users set up an onboarding SSID to the Management portal and use their Google credentials to enroll for a certificate.
The JoinNOW MultiOS helps users onboard their BYOD by selecting their device from a list of supported operation systems. If the device is not in the existing list, the same can be added manually. Once a device is added manually, the admin can now look at device details from his portal and can delete or add devices as required.
Simplify Onboarding for Google Devices with SecureW2
Integrating SecureW2’s Cloud RADIUS with G-Suite is simple because Cloud RADIUS integrates with any identity provider, which includes Google. The CloudRADIUS performs an identity lookup with an IDP before authentication that adds an extra step of validating users in the cloud, making it secure.
SecureW2s Managed API simplifies the onboarding process for both BYODs and managed devices. With the JoinNow Suite, BYOD end users can sign on to the network in just a few Clicks. Our Gateway APIs can be configured to provision every device with a certificate, eliminating the need for manual configuration.
Deploying certificates to your network increases security and relieves the IT department of time spent configuring each device manually. Integrating Cloud RADIUS and SecureW2’s onboarding software streamlines the device authentication process and ensures all devices are equipped with a certificate and easily visible on the network.
Click now for pricing information.
